YMCA Website Services leverages Apache Solr for a few features:
- Activity Finder requires Solr
- Site search can optionally use Solr as per this Pull Request
Quick Start / Upgrade path
Log in as admin.
Go to
admin/modulesand enable the YMCA Website Services Search API module.
Approve the next step for enabling Database Search.

Go to the Search API configuration page
admin/config/search/search-api.Verify that the “OpenY Database Search” server is enabled.
Visit “Search content” index.

TIP: Admins can enable and the Solr search and switch the index between servers.
Index content by clicking “Index now”.

Go to the homepage and search for any keyword.

Verify search results are displayed correctly.
Starting from the YMCA Website Services installer
- Find the
Select search servicestep displayed during the YMCA Website Services installation. - Choose from one of these options during installation:
- None
- Nothing happens if the user chooses this option, search modules are displayed after installation.
- YMCA Website Services Google Custom Search
- Google Custom Search configuration form is displayed if the user chooses this option.
- The YMCA Website Services Google Search module is enabled after installation and ready to use.
- YMCA Website Services Search API
- Search API backend options are displayed in this case with the following options:
- Database
- The YMCA Website Services Search API module is enabled after installation. The database search API server is enabled. The search is ready to use after content indexation.
- Solr
- Additional installation step with Solr configuration form is displayed in this case and user can specify all params for Solr connection. The YMCA Website Services Search API module is enabled after installation, Solr search API server is enabled. The search is ready to use after content indexing (if the correct Solr settings were used).
- Database
- Search API backend options are displayed in this case with the following options:
- None
Switch from database search backend to Solr backend
Watch a video tutorial on how to switch an existing site from the database backend to a Solr server. This requires a Solr server to be configured in your environment.
- Edit the “Solr search” server from the Search API configuration
admin/config/search/search-api. - Add the configuration information for your Solr server. Refer to Drupal’s Search API Solr project for troubleshooting connection information.
- Save the server and observe that Search API has successfully connected to your server.
- Edit the “Search content” index and change the “Server” field to the newly configured “Solr Search” index.
- Visit the “Search content” index and click “Index now” to re-index the content.
Layout Builder and Solr search
Solr search can be used with Layout Builder, and requires a few extra steps.
Configure Solr to index the new content types
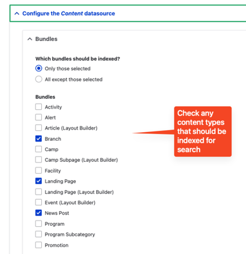
In order for Solr to index the new content types, they need to be added to the index.
- Enable the YMCA Website Services Search API (
openy_search_api) module if not already enabled. - Go to Admin > Configuration > Search and metadata > Search API, then Edit the Search content index. (
/admin/config/search/search-api/index/search_content/edit) - Configure Solr to index the Layout Builder content types:
- Configure how Solr indexes the Layout Builder content types:
- From the Search API configuration, open the dropdown for the Search content index and choose Fields.

- To the right of the Rendered HTML output field options, choose Edit.
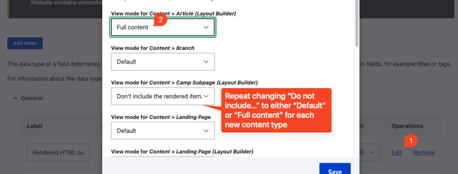
- For each newly added content type, switch “Don’t include the rendered item” to the right view mode.

In general, new Layout Builder specific content types will use the “Default” view mode, while older Layout Builder-compatible content types should use the “Full content” view mode.
Content type View mode Article (LB) Default Branch Full Event (LB) Default Camp Full Camp Subpage Full Facility Full Landing Page (LB) Default Program Full Program Subcategory Full Save the page.
- From the Search API configuration, open the dropdown for the Search content index and choose Fields.
- Once your changes have been saved, re-index the content to see the changes reflected in search results.
Set up a Layout Builder search page
- If you have an existing site, disable the old search page:
- Go to
/search. - Remove the URL alias by unchecking Generate automatic URL alias in the sidebar then deleting
/search. - Uncheck Published and Save to un-publish the page.
- Go to
- Create a new Landing Page (Layout Builder) (
node/add/landing_page_lb):- Set the Title to “Search”.
- Ensure Generate automatic URL alias is unchecked in the sidebar and set the alias to
/search.- If that alias results in an error, you can remove the old one at Admin > Configuration > Search and metadata > URL aliases
- Check Published then Save and edit layout.
- Add a Small Banner to the header with a title for the page, like “Search”.
- Add the search results block to the page:
- In the Body section, Add block, then expand All system block and choose Content search block from the Paragraph Blocks section.
- Optionally, choose to hide the title or change the number of items to display.
- Save layout and check your page.
- Change the Search API config to use your new page:
- Go to Admin > YMCA Website Services > Settings > Search API settings (
/admin/openy/settings/search-api) and set the Search page id to the node id of your new page. - Or, change the config with drush:
drush cset openy_search_api.settings search_page_id <nid>
- Go to Admin > YMCA Website Services > Settings > Search API settings (
- Test the search box in the Layout Builder page header to ensure the new configuration works as expected.
Legacy Solr Support
The contrib Search API Solr module supports a broad swath of Solr versions, but occasionally old versions are dropped from support in the main module. If, when enabling YMCA Website Services Search API, you encounter errors that your version of Solr is out of date, you may need to enable the Search API Solr Legacy module. As of January 2022, Search API Solr Legacy supports Solr 3.6 through 6.4.
The error message when using an old version of Solr may look something like this:
Notice: Undefined index: 4.x in Drupal\search_api_solr\Controller\SolrConfigSetController->getConfigFiles()
