Program Event Framework
A robust set of content types and syncer modules that build interactive tools to help members find and book activities.
“Program Event Framework” refers to the entire ecosystem of content and modules in YMCA Website Services that work together to build Activity Finder, Group Schedules, and more.
Content Types
These provide the containers for PEF content in Drupal:
Syncers
These provide integrations to pull content from external systems into the content types:
Displays
These display the content for users to discover:
- Activity Finder
- Group Schedules
Data model
The network of data structures in PEF can be confusing. Here’s how it all works
---
title: PEF Relationships
---
erDiagram
    program {
        entityRefTerm field_program_color
        paragraph field_content
        paragraph field_header_content
        paragraph field_sidebar_content
        textFormattedLong field_program_description
        entityRefMedia field_program_icon
        entityRefMedia field_program_image
        layout layout_builder__layout
        meta field_meta_tags
        bool field_use_layout_builder
    }
    program_subcategory {
        paragraph field_bottom_content
        entityRefTerm field_category_color
        paragraph field_content
        paragraph field_sidebar_content
        textFormattedLong field_category_description
        paragraph field_header_content
        entityRefMedia field_category_image
        layout layout_builder__layout
        meta field_meta_tags
        entityRefProgram field_category_program
        bool field_use_layout_builder
    }
    program_subcategory }|--|| program : field_category_program
    activity {
        textFormattedLong field_activity_description
        entityRefProgSub field_activity_category
    }
    activity }o--|| program_subcategory : field_activity_category
    "class" {
        entityRefActivity field_class_activity
        paragraph field_bottom_content
        paragraph field_content
        textFormattedLong field_class_description
        paragraph field_header_content
        meta field_meta_tags
        paragraph field_sidebar_content
    }
    "class" }o--|| activity : field_class_activity
    session {
        listText field_activity_type
        entityRefClass field_session_class
        textFormattedLong field_session_description
        dateRange field_session_exclusions
        listText field_session_gender
        numberInt field_availability
        bool field_session_in_mbrsh
        textPlain field_session_instructor
        entityRefLoc field_session_location
        numberInt field_session_max_age
        listText field_session_max_grade
        numberDec field_session_mbr_price
        numberInt field_session_min_age
        listText field_session_min_grade
        numberDec field_session_nmbr_price
        bool field_session_online
        entityRef field_session_plocation
        numberInt field_productid
        link field_session_reg_link
        textPlain field_session_room
        paragraph field_session_time
        numberInt field_wait_list_availability
    }
    session }|--|| "class" : field_session_class
    session ||--o{ session_time_paragraph : field_session_type
    session_time_paragraph {
        dateRange field_session_time_date
        listText field_session_time_days
        textPlain field_session_time_override
    }
    branch {

    }
    camp {

    }
    facility {

    }
    session }o--|| branch : field_session_location
    session }o--|| camp : field_session_location
    session }o--|| facility : field_session_location
    session }o--|| facility : field_session_plocation
More information on how this data gets out into each display will be coming soon.
1 - Activity Finder
Provides an interactive tool to help members find and book activities.
YCloudYUSA/yusaopeny_activity_finder is bundled as a “decoupled application” that ships with the YMCA Website Services distribution.
Requirements
This module requires the following modules:
This module also requires one of the following to store data:
- A Solr server (preferably a server or index per-environment).
- A subscription with access to the
Daxko API.
Recommended modules
Activity Finder is most often used with a
syncer to pull data from an external source.
Installation
Activity Finder version 4 is the current major version. Prior to 9.2.10.0, the distribution required ^3.1 || ^4.0, allowing you to choose which version you want to use depending on the project requirements.
Deprecations
Outdated implementations are not removed immediately, allowing you to update your projects and migrate to new components without breaking your site. They are marked with [deprecated] notices in the next version and are planned to be removed in the future releases.
New Projects
Install as you would normally install a contributed Drupal module. For further
information, see
Installing Drupal Modules.
New projects should enable:
- Activity Finder (
openy_activity_finder)
then choose one or both of the front ends:
- LB (Layout Builder) Activity Finder (
lb_activity_finder) - Open Y Paragraph Activity Finder (
openy_prgf_activity_finder_4)
and finally enable one of these data stores:
- Search API Solr (
search_api_solr) - Daxko API v2 integration (
openy_daxko2)
Existing Projects
You have a choice of either staying on the same version you use or to update to the next version. It depends on your project requirements and customizations. We recommend updating to the latest release if you have resources for it.
Update from version 3.x to version 4.x
Activity Finder is a complex functionality, it connects together many different
pieces and might require additional steps to make it working. The list of
actions below outlines the major steps to get Activity Finder updated to
version 4.
- Update the codebase using the composer command:
composer require ycloudyusa/yusaopeny_activity_finder:"^4.0" - Run database updates
drush -y updb.- Verify there were no errors and updates went fine.
- Install the new “Open Y Paragraph Activity Finder” (
openy_prgf_activity_finder_4):
drush en openy_prgf_activity_finder_4 - Create or update a existing Landing Page with Activity Finder.
- Add Activity Finder paragraph (replace the deprecated paragraph), configure
it and save the page.
- Verify the page and Activity Finder functionality is working fine
- The previous version of Activity Finder used 2 landing pages with 2 paragraph
types - one for wizard and another one for results. Find and remove these
pages.
- Uninstall “OpenY Paragraph Activity Finder” (
openy_prgf_activity_finder). - Uninstall “OpenY Paragraph Activity Finder Search” (
openy_paragraph_activity_finder_search).
Configuration
Set up Solr
In order to install Solr -
check the documentation on Drupal.org.
After enabling the above modules you should visit /admin/config/search/search-api and obtain config.zip from preconfigured by Open Y Solr Server setup
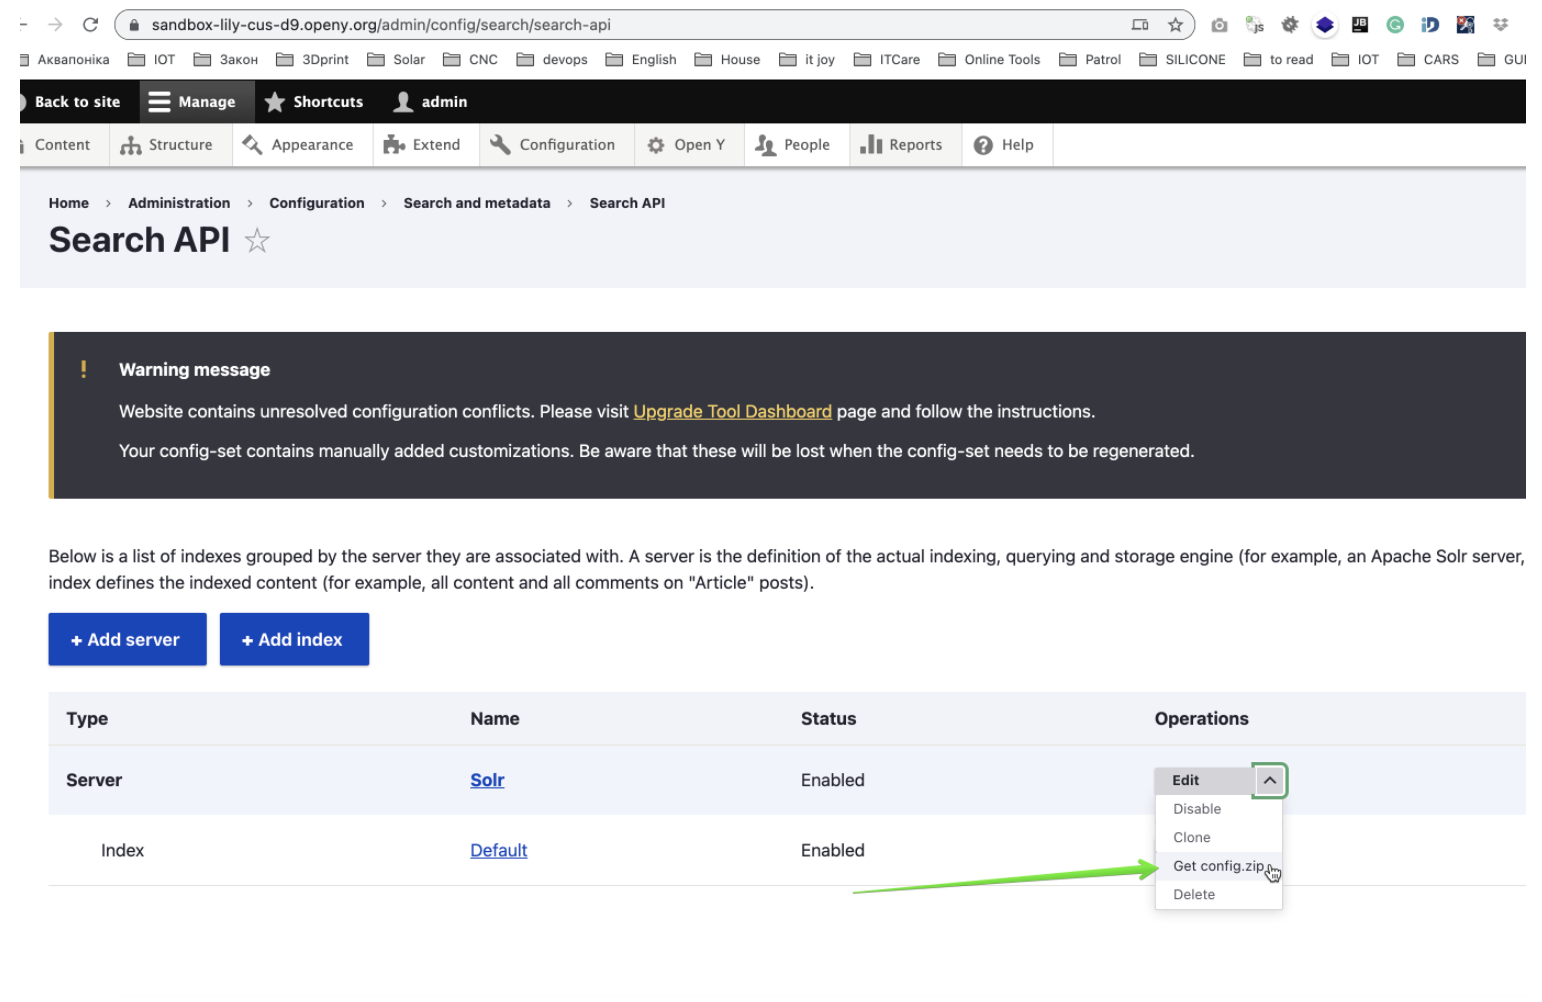
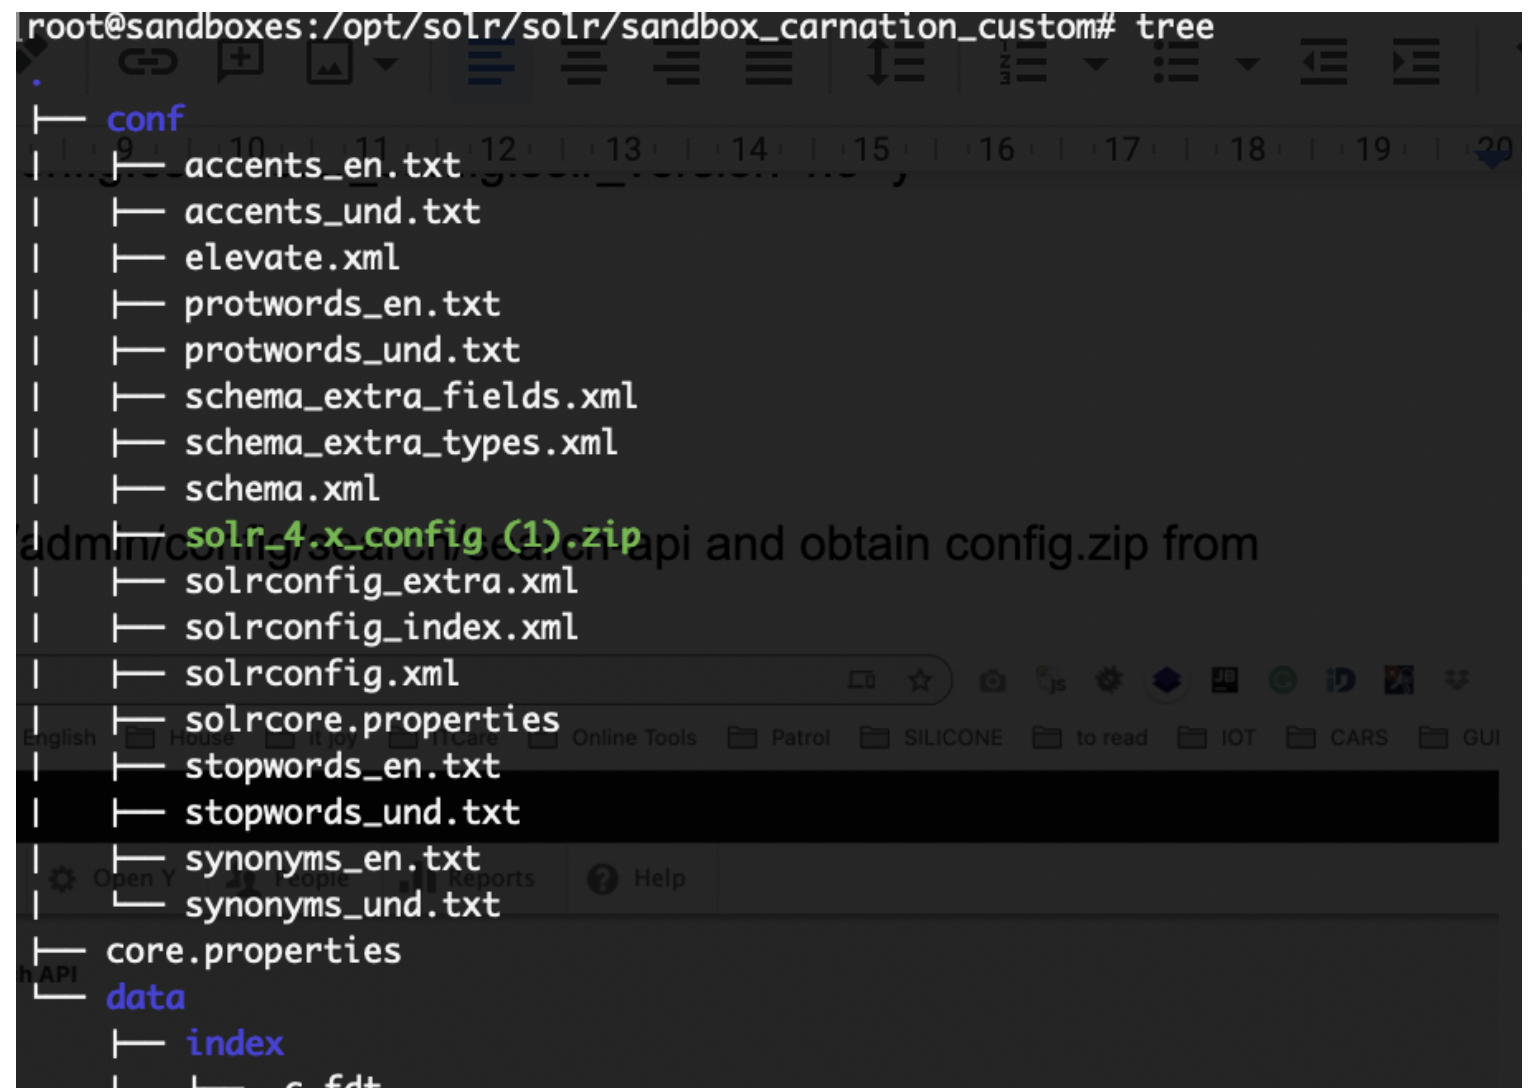
This configuration should be installed on your Solr server as an independent core. it should be extracted to the conf directory of a solr core
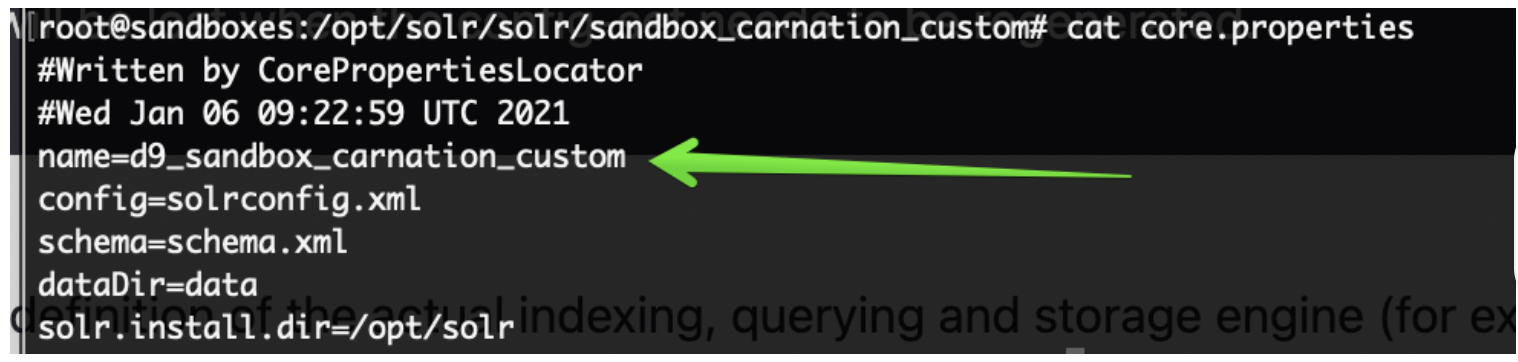
Once it is done - ensure the name of your core from core.properties file added to Solr Server config in Open Y
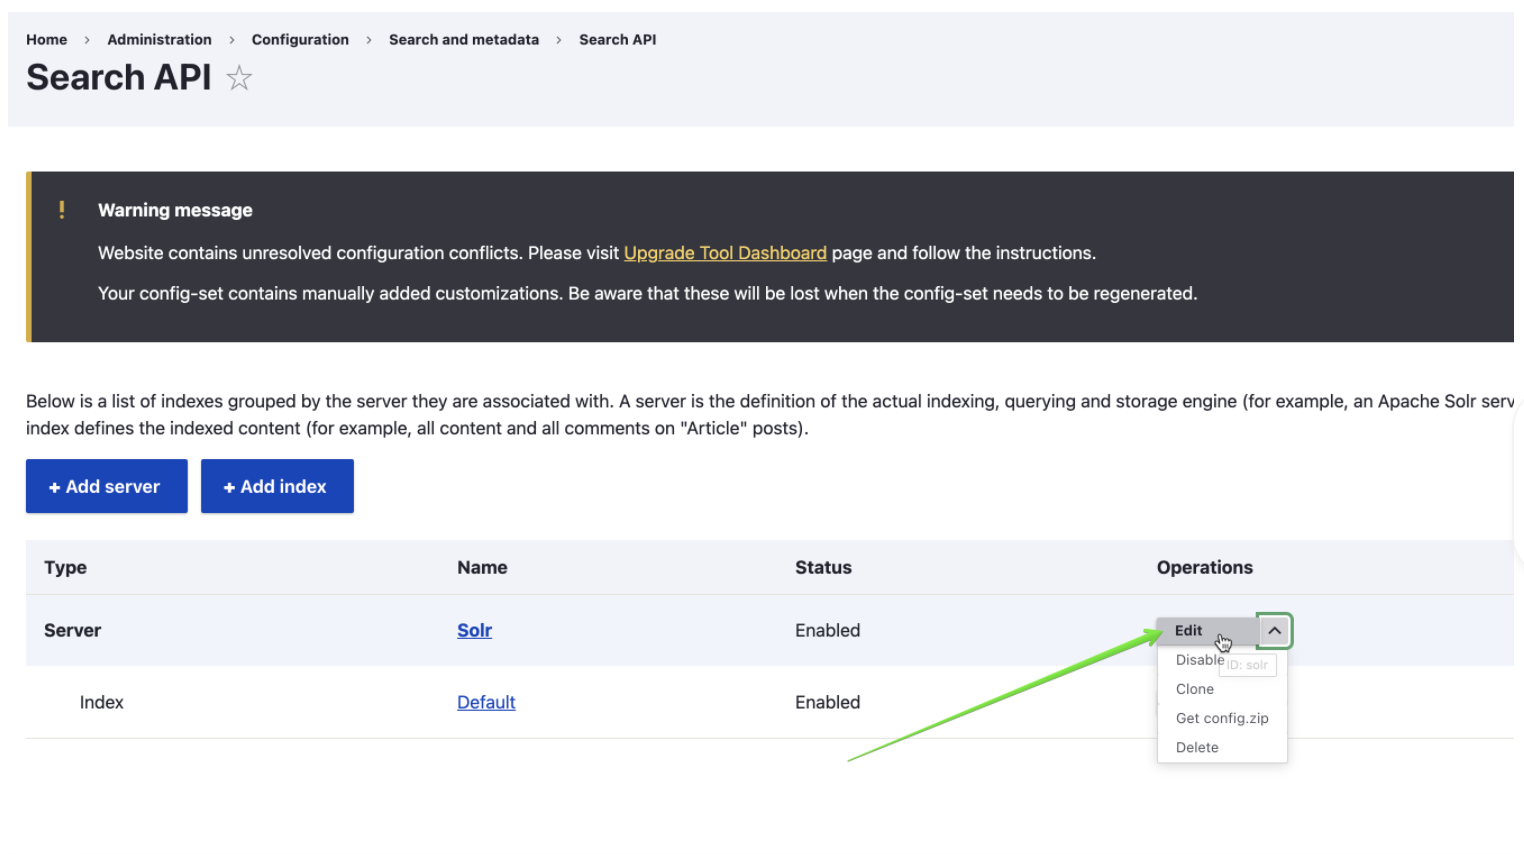
Solr server configuration could be found in Dropdown at /admin/config/search/search-api

If you prefer drush configuration you may use commands below, just replace SOLR_CORE_IS_HERE with real core name
drush cset -y search_api.server.solr backend_config.connector_config.host 127.0.0.1 -y
drush cset -y search_api.server.solr backend_config.connector_config.core ${SOLR_CORE_IS_HERE} -y
drush search-api:reset-tracker
drush search-api:index
Once this is done you should see Solr Server as Index as Enabled on a /admin/config/search/search-api
If you installed Open Y with Demo content now it is time to create a Landing Page with the Activity Finder v4 component on it.
In Open Y we have a specially created module which can this for you
Enable openy_prgf_af4_demo by drush command
drush en openy_prgf_af4_demo
and you’d get /activity-finder-v4 Landing Page created automatically which should look like
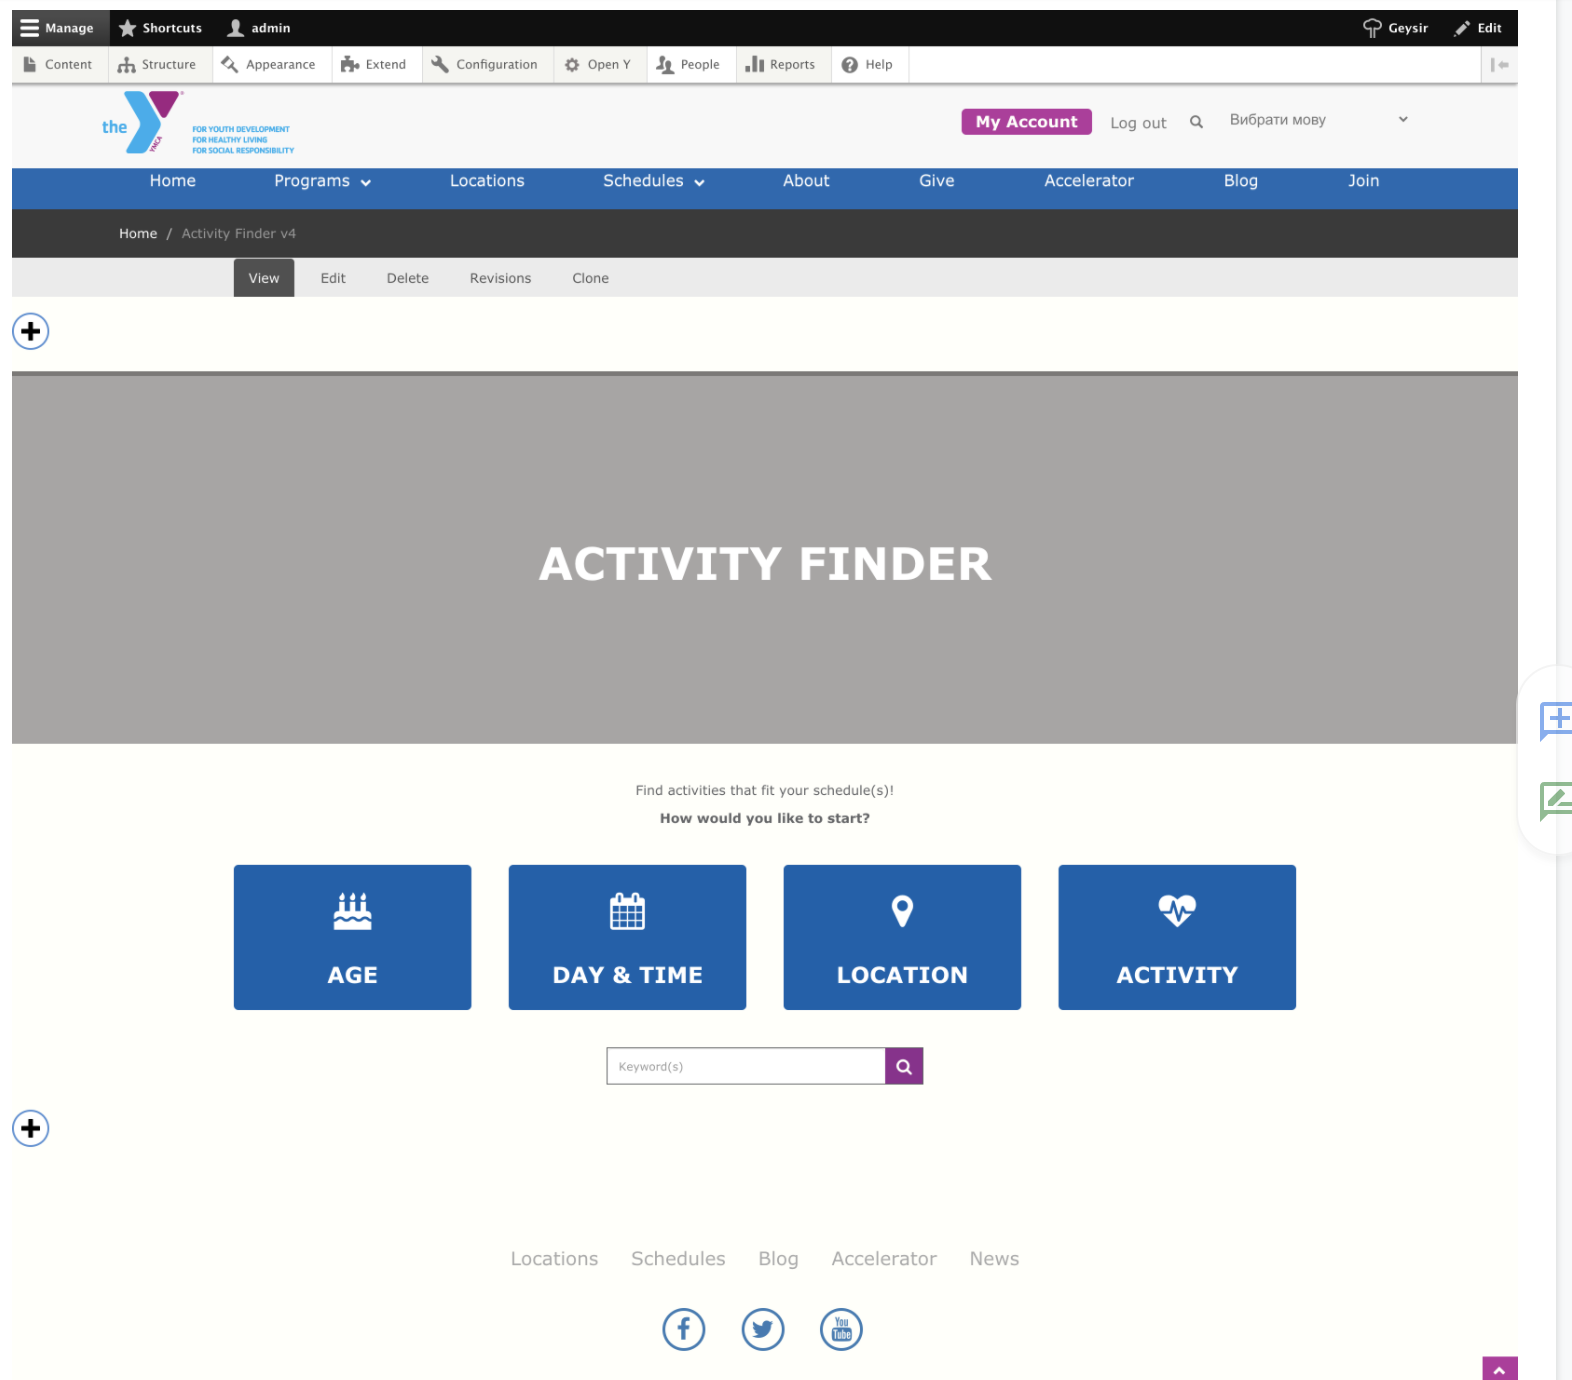
when you visited it.
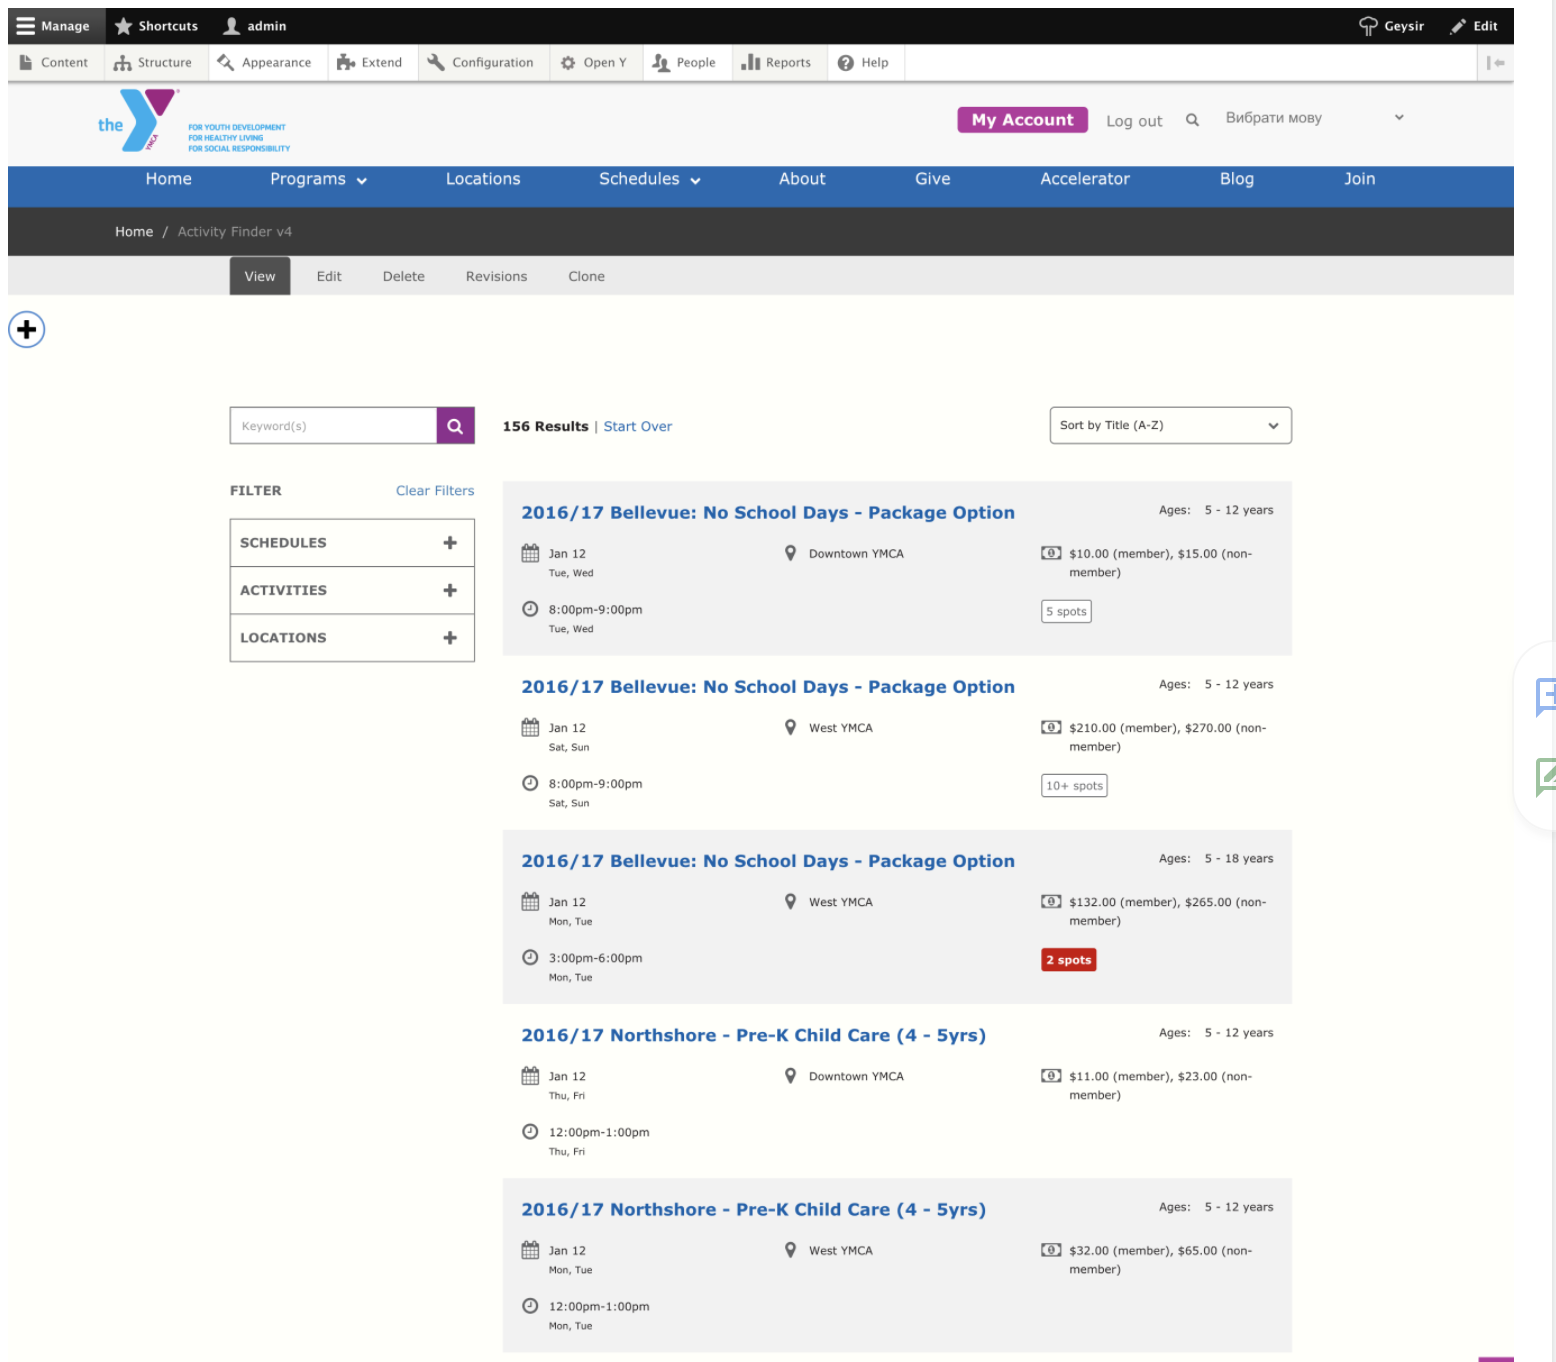
By visiting /activity-finder-v4?step=results or clicking on suggested buttons you should see results, activities with filters and all other functionality, shipped with Activity Finder v4
For the Demo content from OpenY, it should look like
Set Trusted Redirect Host patterns
Activity Finder has a feature to track redirects to 3rd party systems. In order
to control the URLs to redirect to you should use the trusted host patterns.
This feature works similar to Drupal core trusted_host_patterns setting.
Example - add this section to the settings.php:
// Trusted hosts to redirect to for Activity Finder.
$settings['activity_finder_trusted_redirect_host_patterns'] = [
  '^apm\.activecommunities\.com$',
];
It is also recommended to disallow these paths in robots.txt:
# Activity Finder redirects
Disallow: /af/register-redirect/
Disallow: /index.php/af/register-redirect/
Add the Activity Finder block
See
the full documentation on Activity Finder for information on how to add the block to your page and block options.
Troubleshooting & FAQ
To demo Activity Finder, see these sandboxes:
- Activity Finder v4
- Activity Finder v3
Limitations with using Daxko backend
When using the Daxko backend. Developers should be aware of these limitations:
- We can’t use home branch functionality on start screen.
- We have to use Legacy mode.
- We can’t display count of result for each age on the age’s wizard step.
- We can’t display count of available spots for each activity, before user click by activity details.
- Limited pager on results page. We can display only previous and next page link and can’t display count of pages.
How to override processResults in Activity Finder
See openy_activity_finder.api.php
/**
 * Implements hook_activity_finder_program_process_results_alter().
 */
function custom_module_activity_finder_program_process_results_alter(&$data, NodeInterface $entity) {
  // Get formatted session data from some custom service.
  $formatted_session = \Drupal::service('ymca_class_page.data_provider')
    ->formatSessions([$entity], FALSE);
  $formatted_session = reset($formatted_session);

  // Fix pricing according to YMCA price customization.
  $data['price'] = '';
  if (!empty($formatted_session['prices'])) {
    foreach ($formatted_session['prices'] as $price) {
      $data['price'] .= implode(' ', $price) . '<br>';
    }
  }

  // Fix availability and registration according to YMCA customization.
  $messages = [
    'begun' => t('This class has begun.'),
    'will_open' => t('Registration for this class opens shortly. Please check back.'),
    'inperson' => t('Online registration is closed. Visit a YMCA branch to register.'),
    'included_in_membership' => t('Included in Membership'),
  ];

  if (isset($messages[$formatted_session['reg_state']])) {
    $data['availability_note'] = $messages[$formatted_session['reg_state']];
  }
}
How to add external functionality to analytics event
See openy_af4_vue_app/main.js
// Listen to a custom event to pass events in Google Analytics.
document.addEventListener('openy_activity_finder_event', (e) => {
  const { action, label, value, category } = e.detail

  if (window.gtag) {
    window.gtag('event', action, {
      event_category: category,
      event_label: label,
      value: value
    })
  } else if (window.ga) {
    window.ga('send', 'event', category, action, label, value)
  }
})
Example of custom event
document.addEventListener('openy_activity_finder_event', (e) => {
  const { action, label, value, category } = e.detail // Properties you can use for analitics.
  ...
  { your_functionality }
  ...
})
Add custom component in between of results
it allows flexibility in terms of results rendering for the developer:
          <ResultsList
            :results="data.table"
            :ages="ages"
            :selected-ages="selectedAges"
            :legacy-mode="legacyMode"
            :disable-spots-available="disableSpotsAvailable"
            @showActivityDetailsModal="showActivityDetailsModal($event)"
          />
can be changed to this:
          <ResultsList
            :results="data.table.slice(0, 2)"
            :ages="ages"
            :selected-ages="selectedAges"
            :legacy-mode="legacyMode"
            :disable-spots-available="disableSpotsAvailable"
            @showActivityDetailsModal="showActivityDetailsModal($event)"
          />
          <YGBWAds />
          <ResultsList
            :results="data.table.slice(2)"
            :ages="ages"
            :selected-ages="selectedAges"
            :legacy-mode="legacyMode"
            :disable-spots-available="disableSpotsAvailable"
            @showActivityDetailsModal="showActivityDetailsModal($event)"
          />
where YGBWAds is custom component to render custom content in between the results.
See
https://github.com/ymcatwincities/openy_activity_finder/pull/148
1.1 - Adding Activity Finder to your site
Both v4 and v3 could live together as independent programs on your site, and they will show the same data from the Program Event Framework of Open Y
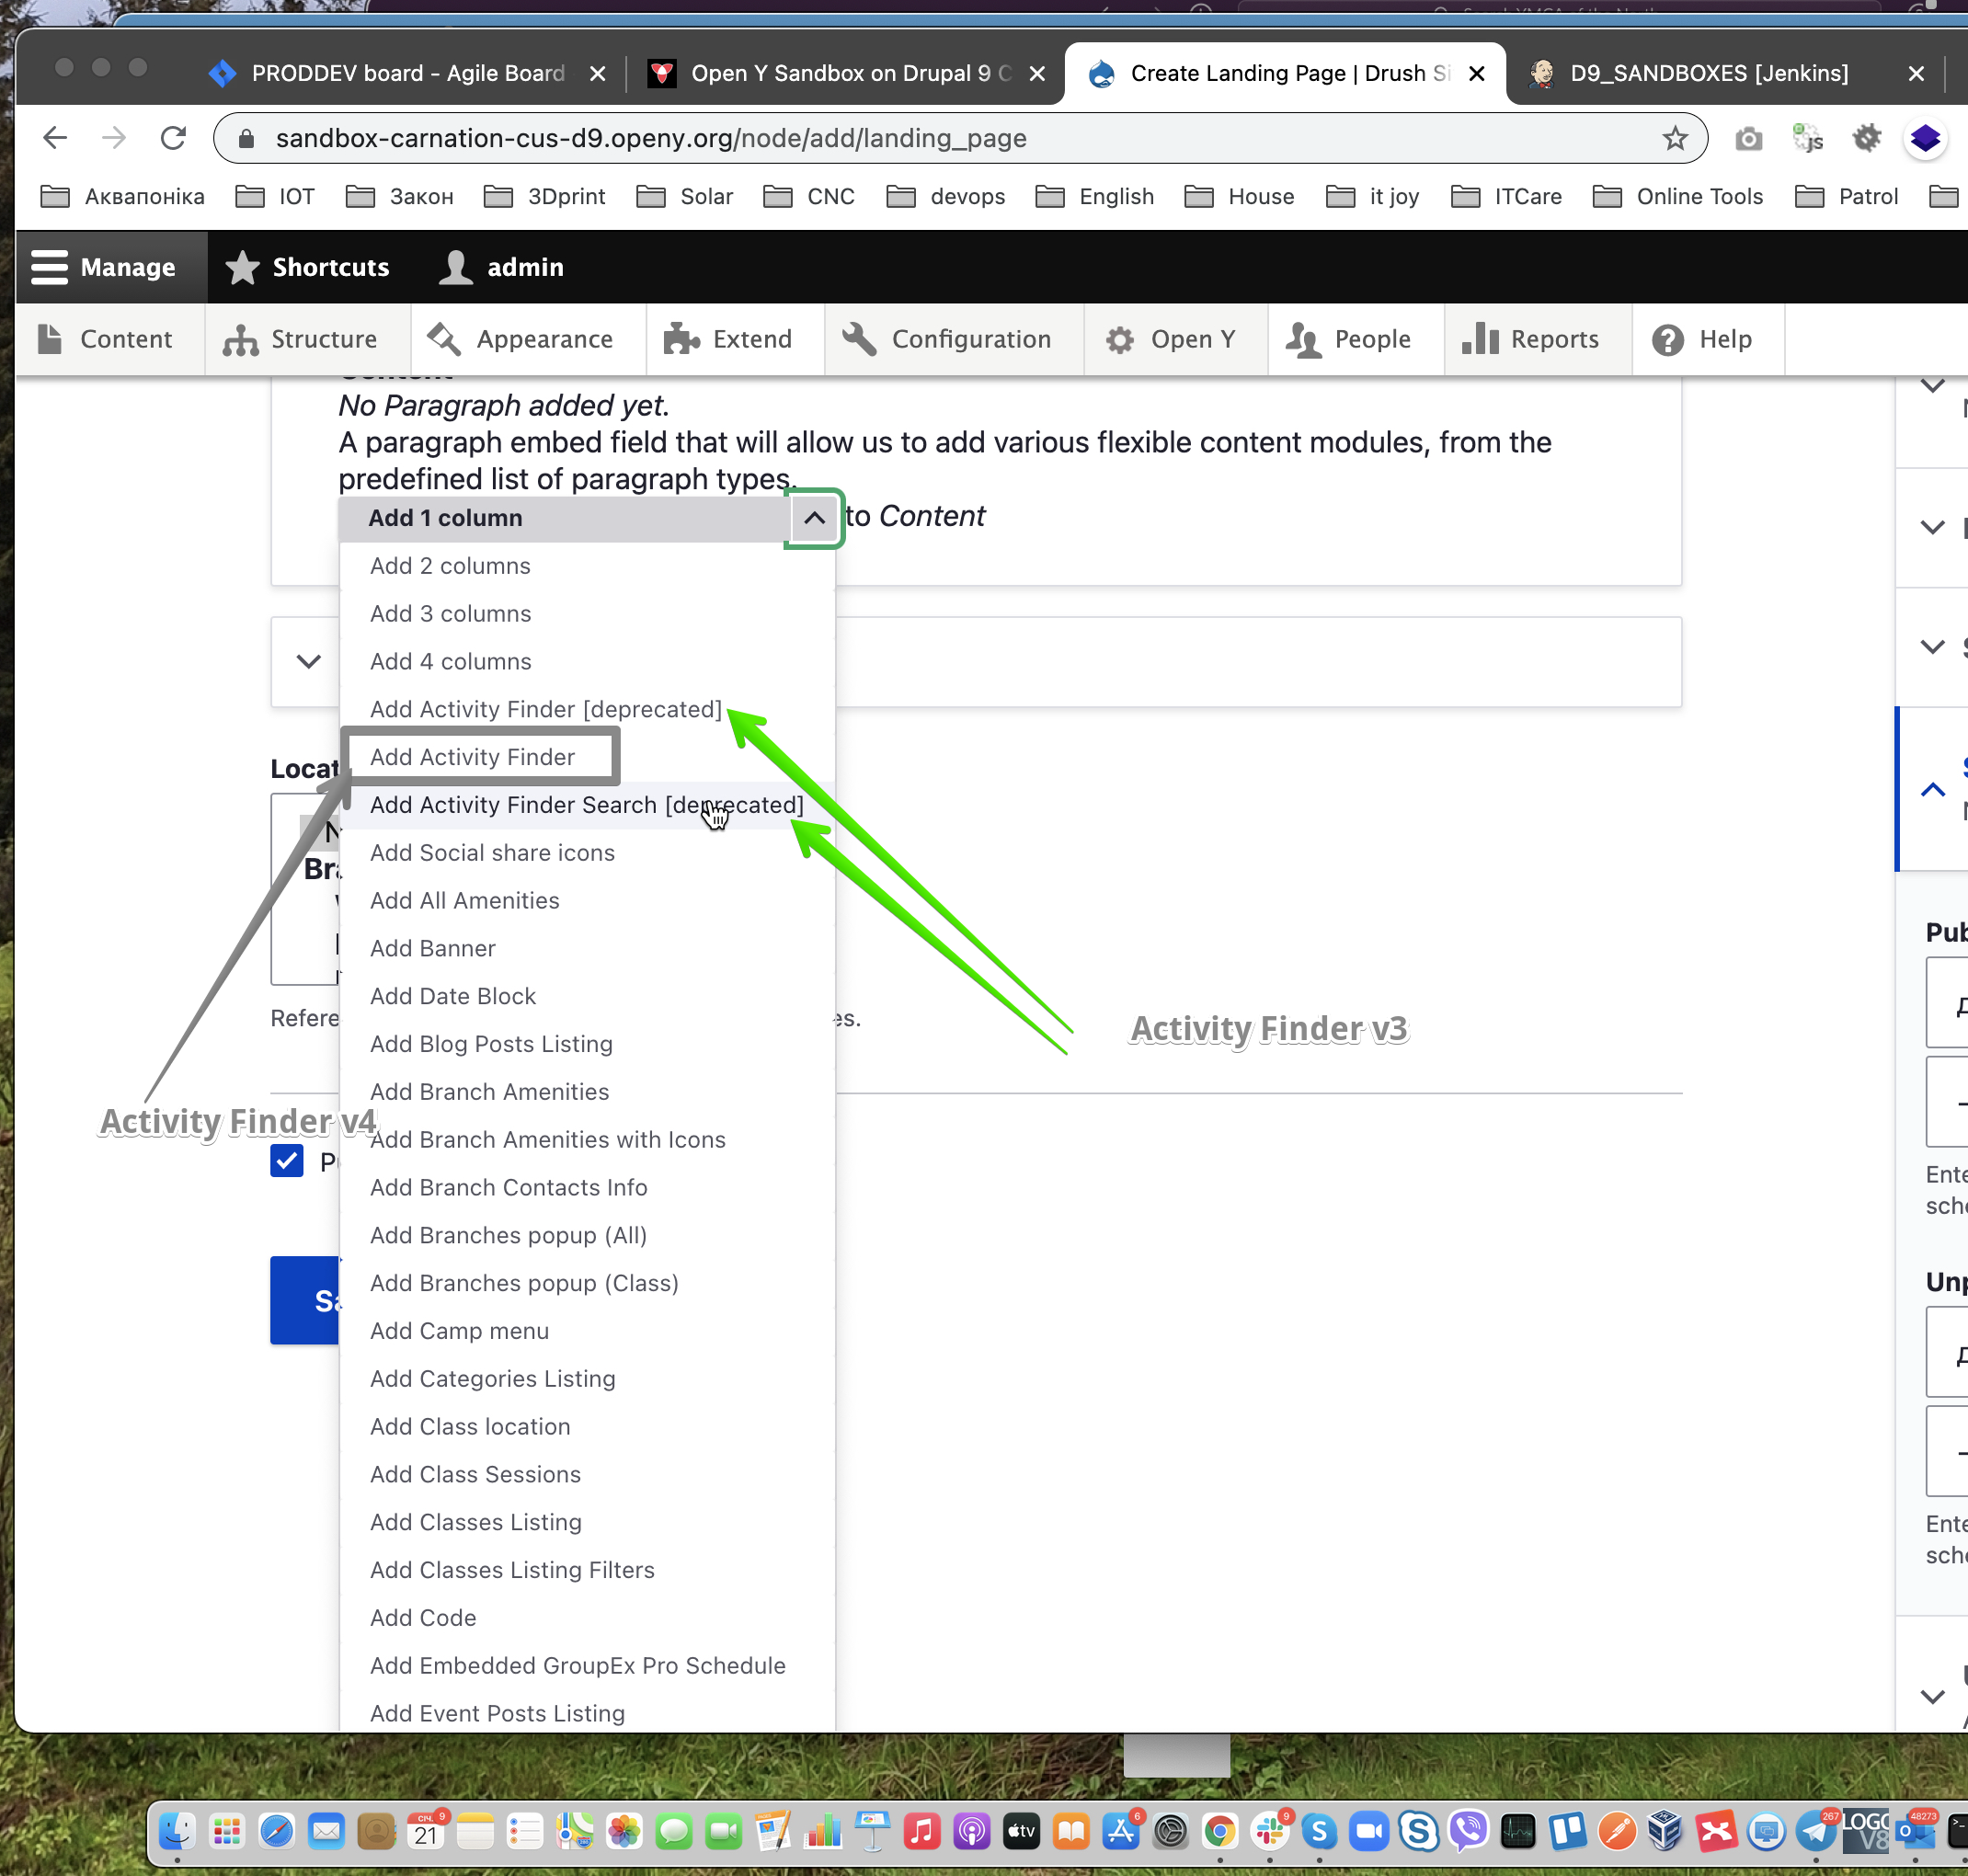
On the screenshot above you can see Open Y components in a list for both Activity Finder v3 and v4
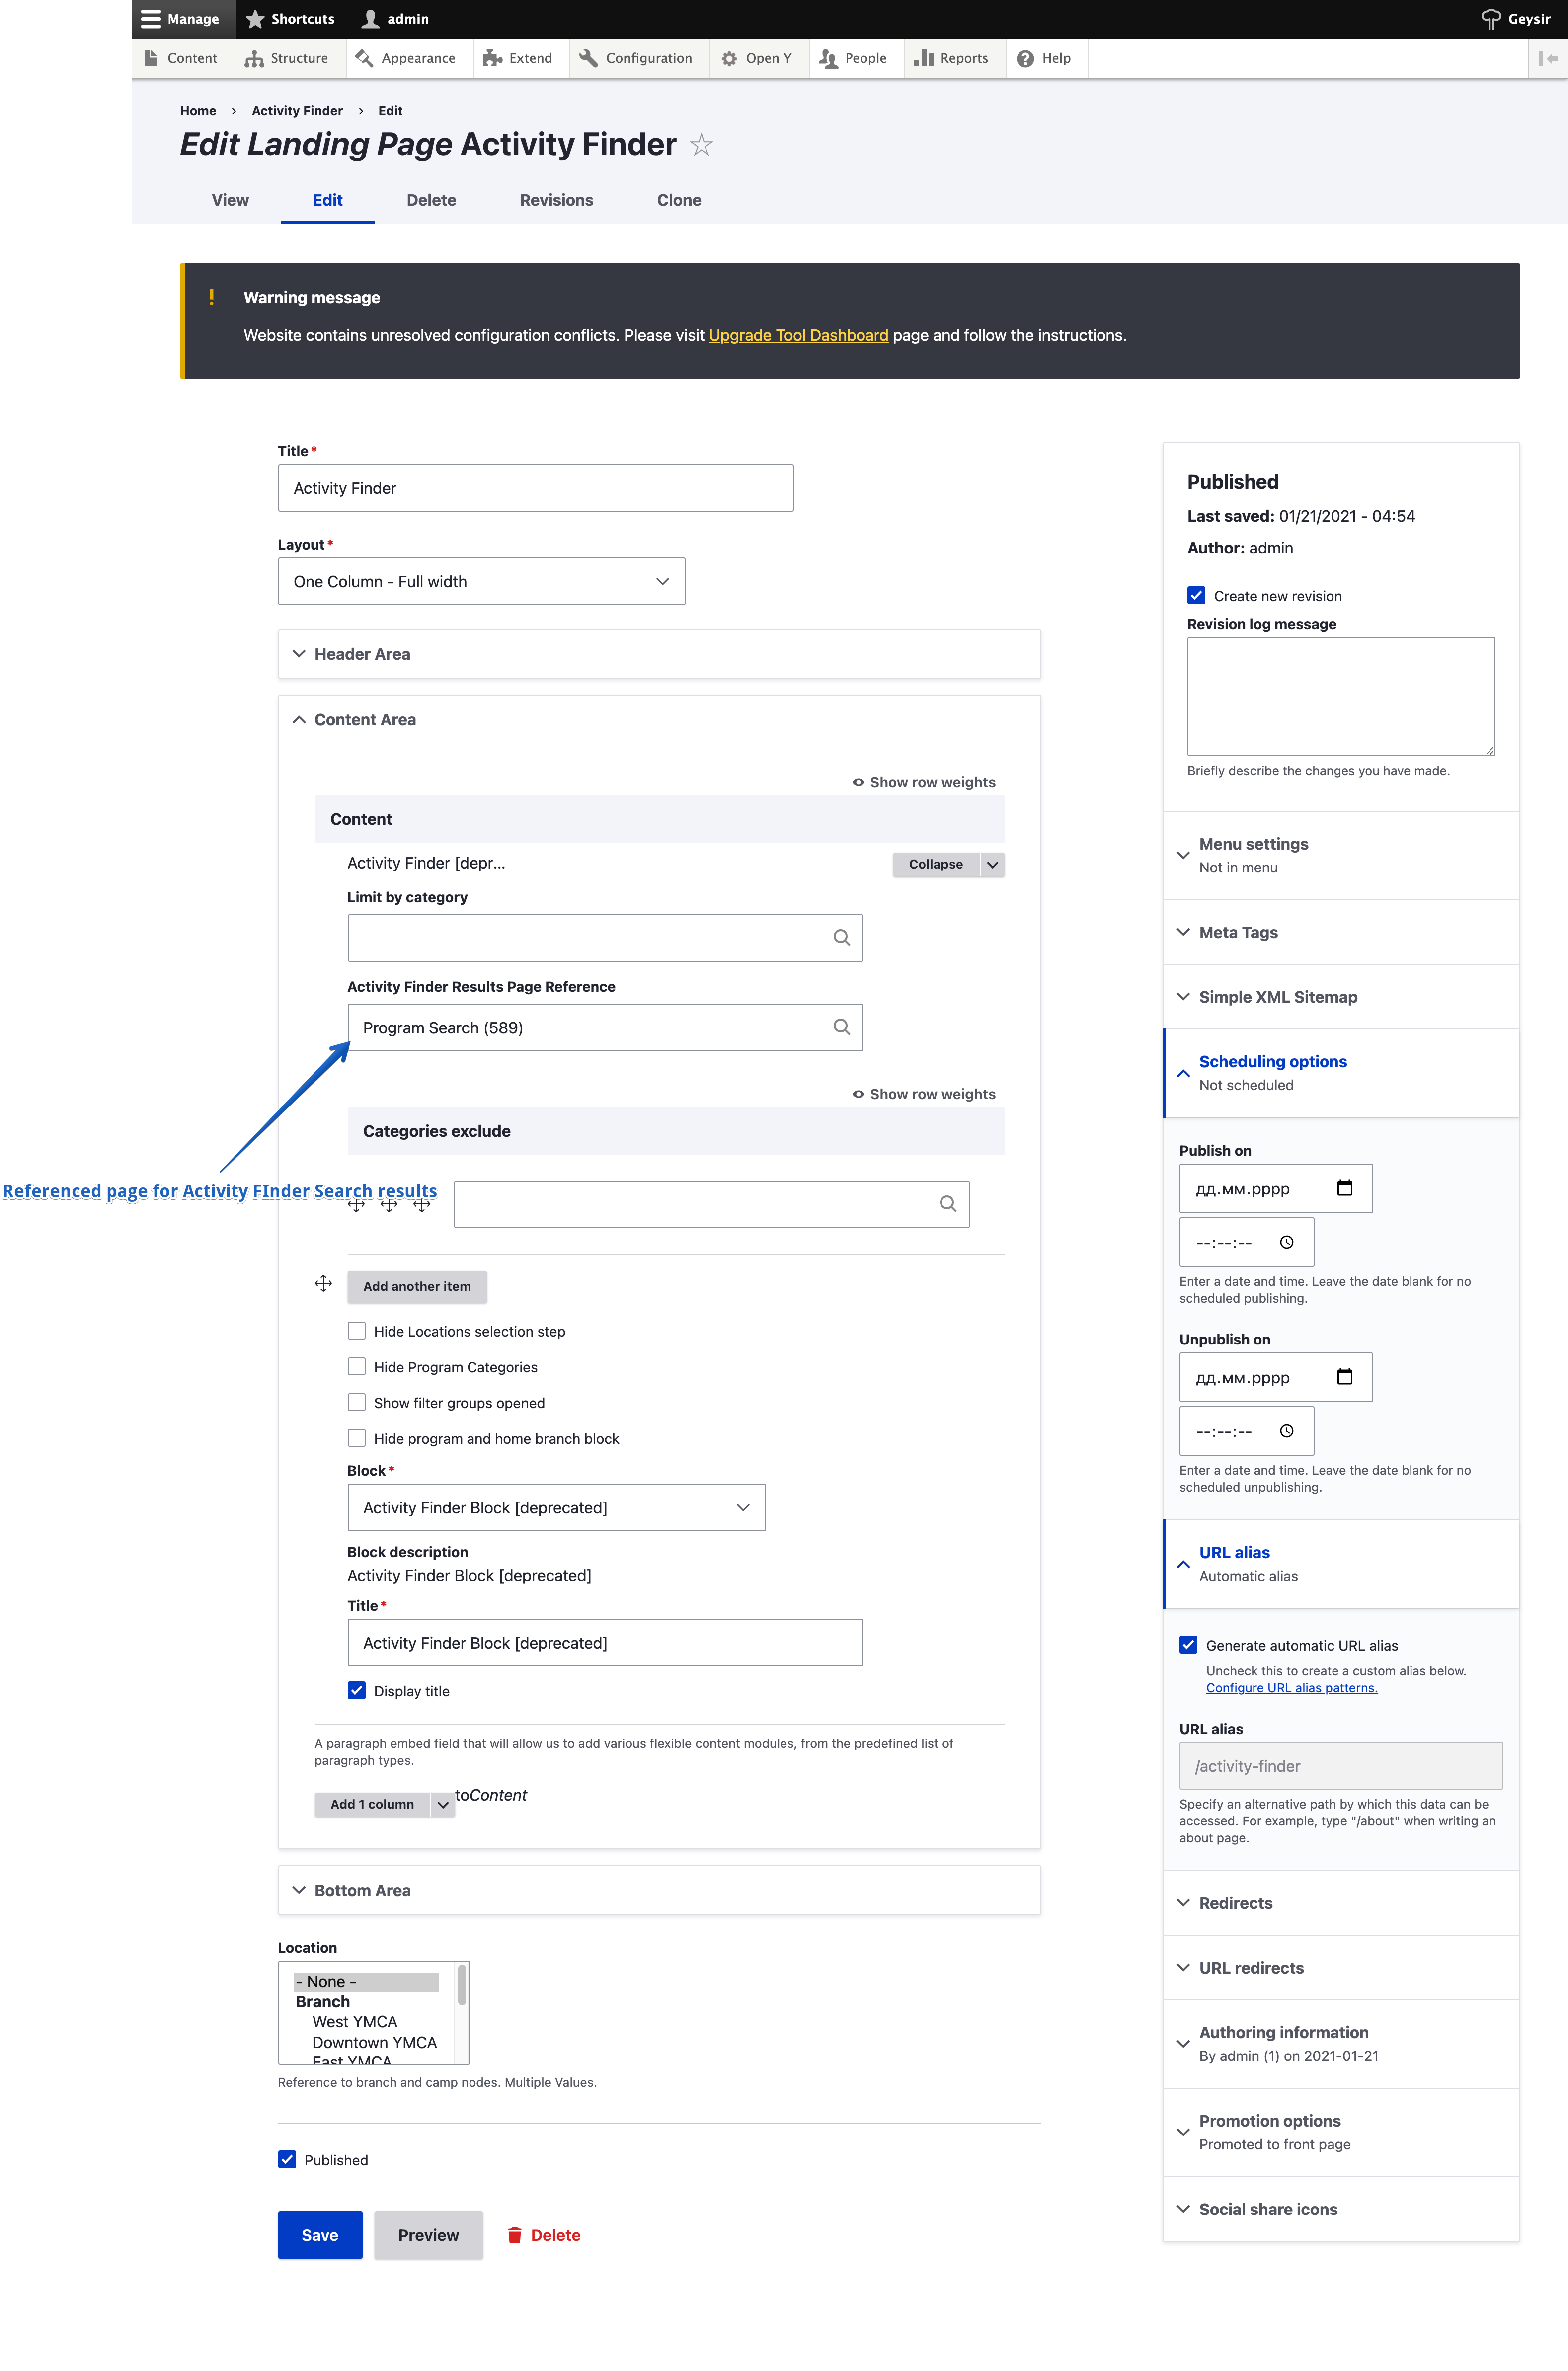
In order to create v3 Activity Finder application you need to create 2 landing pages, referencing each other, one with Activity Finder [deprecated], another one with Activity Finder Search [deprecated]
 See
See
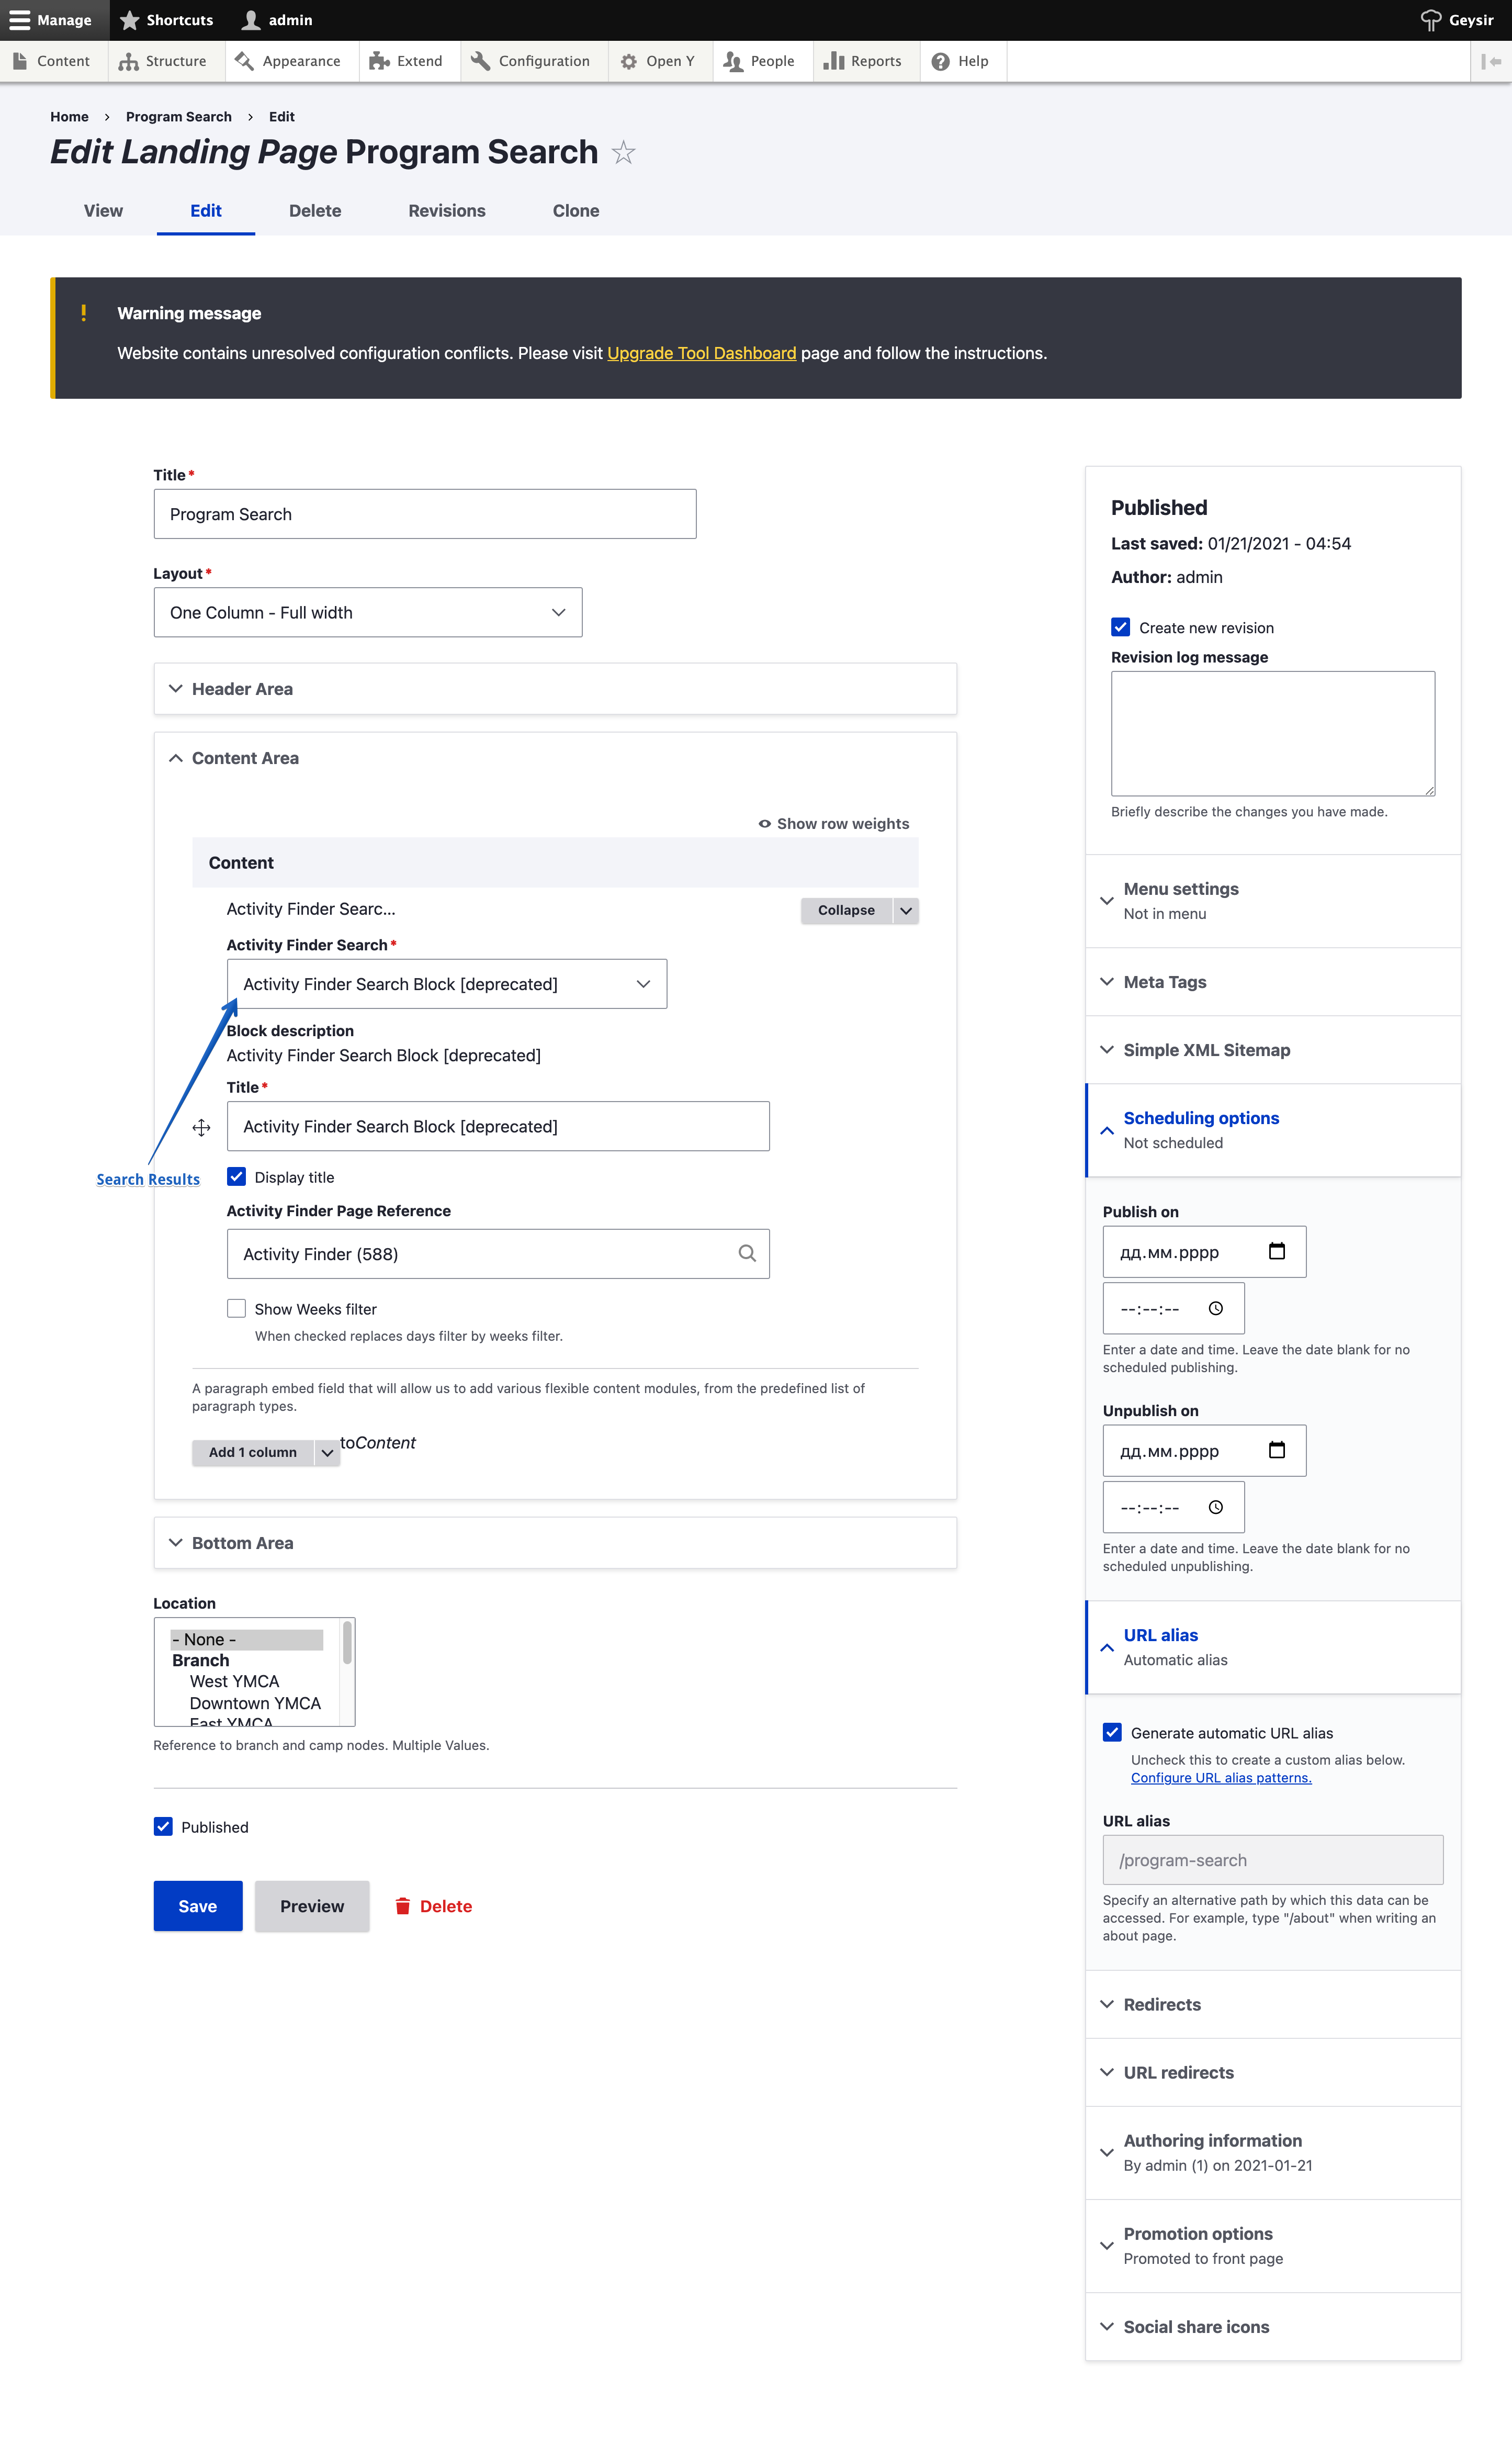 See
See
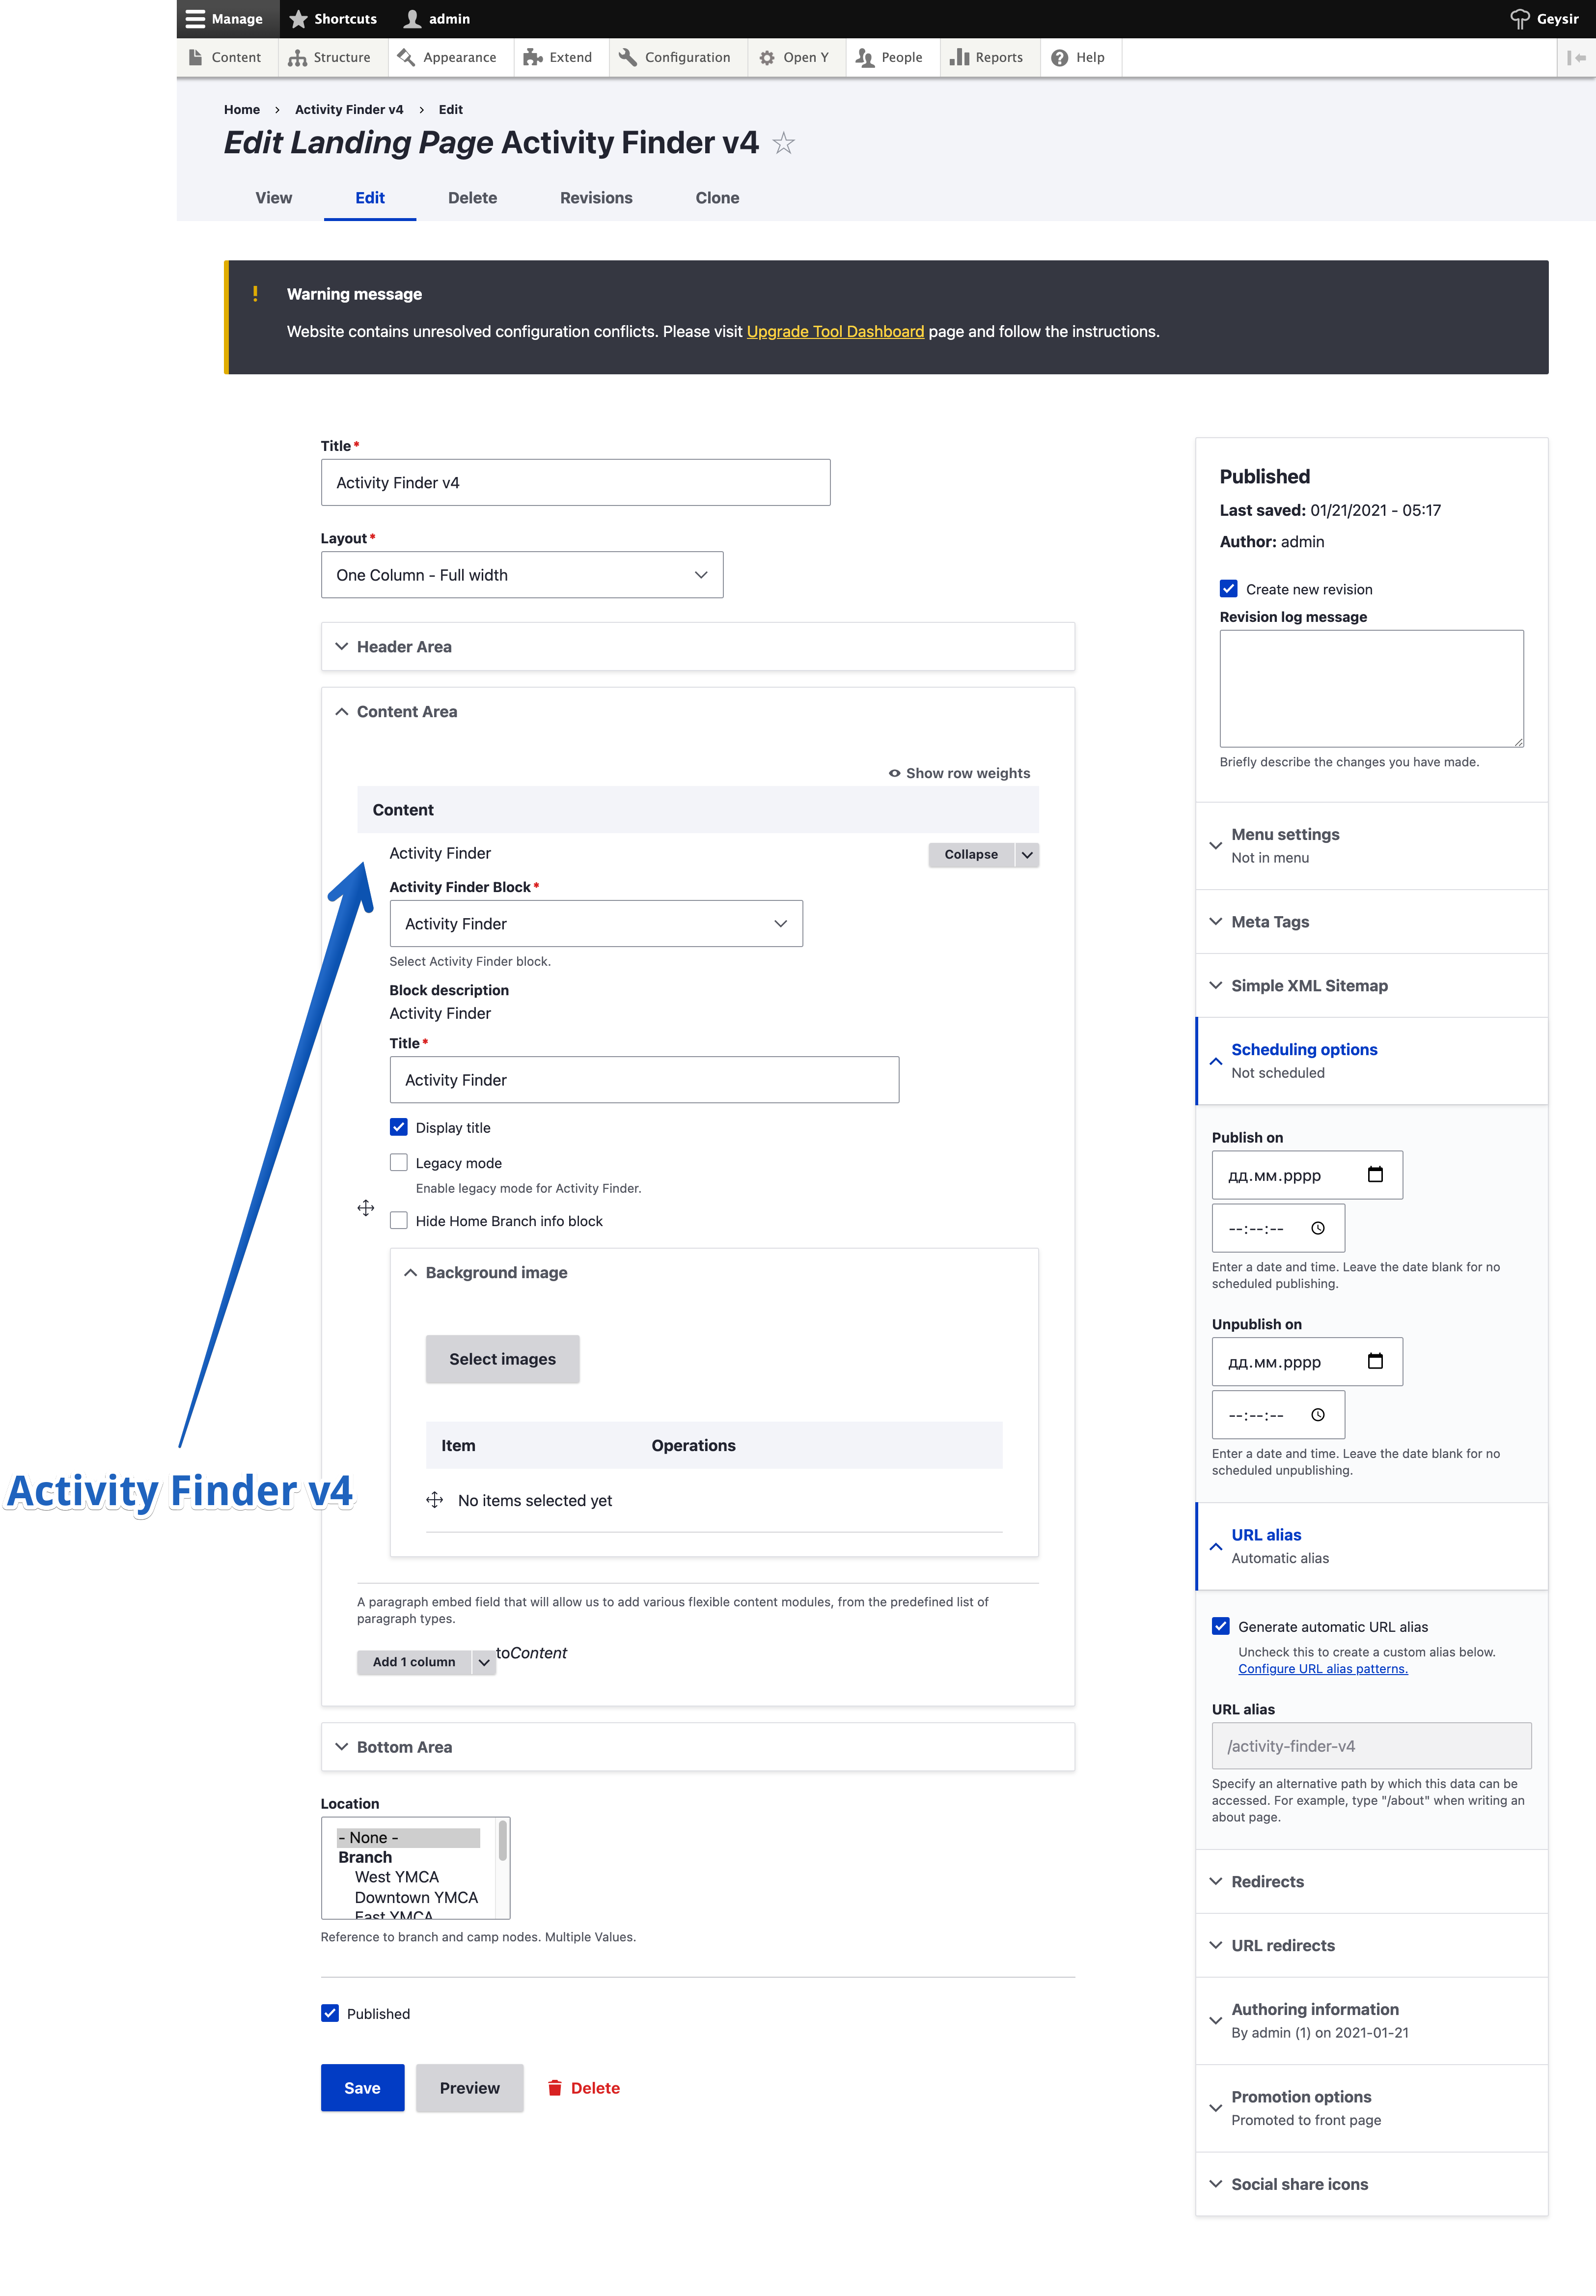
In order to create v4 Activity Finder application, you need to create 1 landing page, with the Activity Finder component on it
 See sandbox
1.2 - Bootstrap version support for Activity Finder
In the Carnation theme we use bootstrap v 4.6 and for this case we have a special option Bootstrap version in settings form for Activity Finder v4
(/admin/openy/settings/activity-finder)
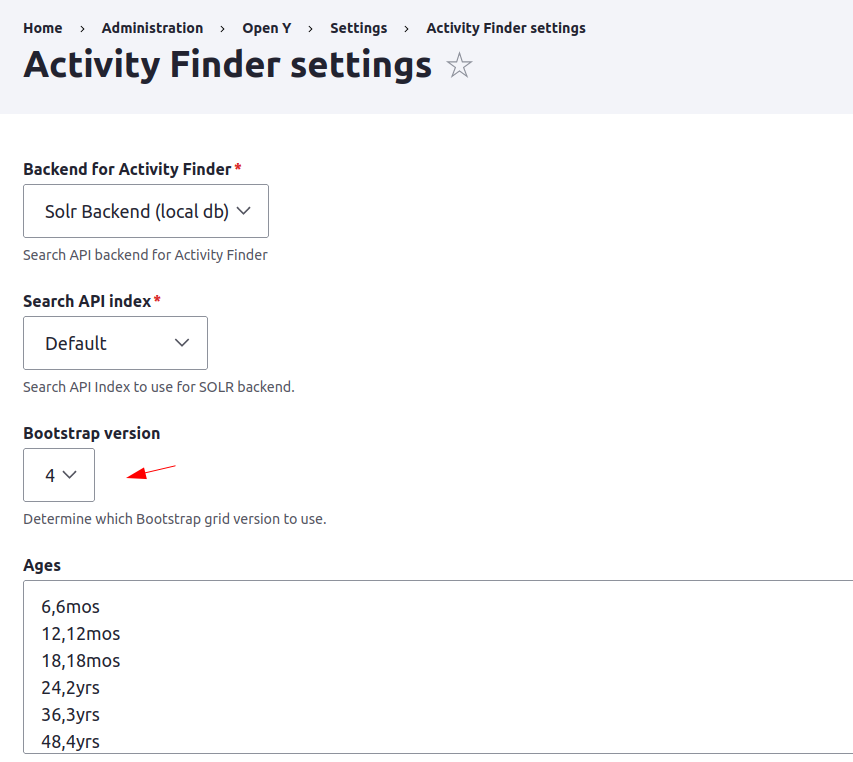
Carnation theme uses Bootstrap v4
And when we set it to 4 then the AF4 result page looks good for the tablet screen on Carnation

1.3 - Configuring Solr for Activity Finder
In order to install YMCA Website Services and Activity Finder v4 you need to run command
composer create-project ycloudyusa/yusaopeny-project build --no-interaction
Which will pull YMCA Website Services on Drupal stable version with Activity Finder v4 latest stable version
Then you should proceed with a regular installation with Demo content enabled as described in our tutorials. It’s better to setup Extended or Custom( only via drush ) in order to skip a bunch of manual steps
When you have YMCA Website Services (former Open Y) installed, list of the command you need to run in order to enable Activity Finder v4
# Solr 8.8.1, Activity Finder v4
drush en -y search_api_solr_legacy openy_prgf_activity_finder_4 || true
drush en -dvy openy_prgf_af4_demo || true
After enabling the above modules you should visit /admin/config/search/search-api and obtain config.zip from preconfigured by Open Y Solr Server setup
Hint: Open Y module’s infrastructure supports SOLR versions 8 up to the latest 8.8.1 as well. Activity Finder is tested against Solr 8.8.1. In order to install Solr -
check the documentation on Drupal.org.
Solr versions prior 7.7 are End of Life, Open Y team is working on upgrading support for decent versions of Solr.
This configuration should be installed on your Solr 8.8.1 server as a independent core. it should be extracted to conf directory of a solr core
Once it is done - ensure the name of your core from core.properties file added to Solr Server config in Open Y
Solr server configuration could be found in Dropdown at /admin/config/search/search-api
If you prefer drush configuration you may use commands below, just replace SOLR_CORE_IS_HERE with real core name
# Solr 8.8.1, Activity Finder v4

drush cset -y search_api.server.solr backend_config.connector_config.host 127.0.0.1 -y || true
drush cset -y search_api.server.solr backend_config.connector_config.core ${SOLR_CORE_IS_HERE} -y
drush cset -y search_api.server.solr backend_config.connector_config.solr_version 8 -y
drush search-api-mark-all || true
drush sapi-i || true
Once you done this you should see Solr Server as Index as Enabled on a /admin/config/search/search-api
If you installed Open Y with Demo content now it is time to create a Landing Page with the Activity Finder v4 component on it.
In Open Y we have a specially created module which can this for you
Enable openy_prgf_af4_demo by drush command
# Solr 8.8.1, Activity Finder v4
drush en -dvy openy_prgf_af4_demo || true
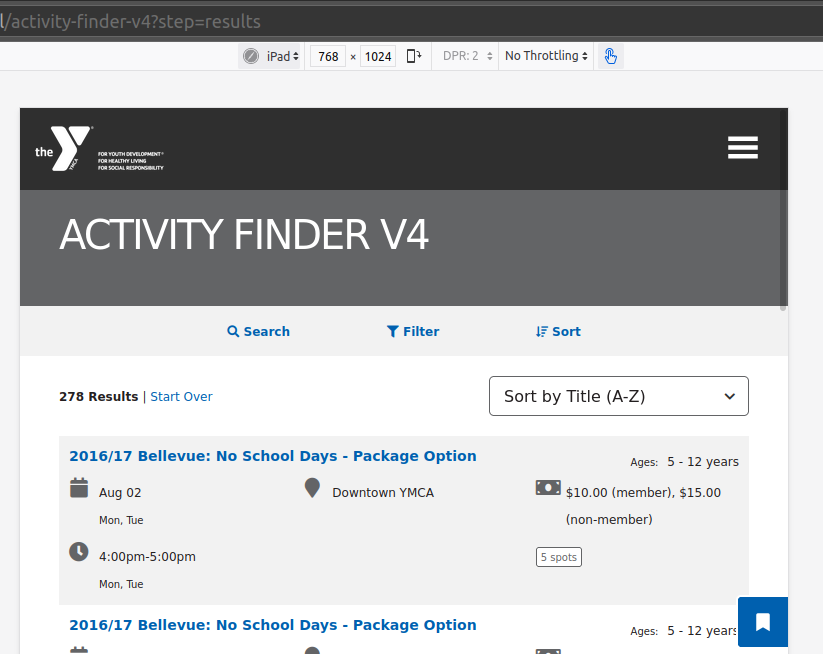
and you’d get /activity-finder-v4 Landing Page created automatically which should look like
when you visited it.
By visiting /activity-finder-v4?step=results or clicking on suggested buttons you should see results, activities with filters and all other functionality, shipped with Activity Finder v4
For the Demo content from OpenY, it should look like
See sandbox
Activity Finder v3 also installed when you chose Custom Installation with Demo content and is part of demo content.
Could be accessed via /activity-finder url
See sandbox
Development SOLR 8 installation
Solr Docker readme
https://github.com/docker-solr/docker-solr/blob/master/README.md
mkdir solr8
sudo chown 8983:8983 solr8
docker run -v "$PWD/solr8:/var/solr" -p 8984:8983 --name d9_sandbox_carnation_custom solr solr-precreate d9_sandbox_carnation_custom
# stop docker and remove created container
# unpack solr_8.x_config.zip into data/d9_sandbox_carnation_custom/conf/

docker run -v "$PWD/solr8:/var/solr" -p 8984:8983 --name d9_sandbox_carnation_custom solr solr-precreate d9_sandbox_carnation_custom
Configure Open Y to change Solr version to 8.x
Change address port to 8984
Rebuild index information
Reindex
Check Activity Finder v4 is working now
2 - PEF Schedules
The “PEF Schedules” module allows Ys to create and manage schedules with a simple, calendar-based view.
YCloudYUSA/y_pef_schedule
The Y PEF Schedule module provides a calendar functionality for scheduling events.
It includes a Vue.js component, fullcalendar-app, to display and interact with the calendar.
Requirements
Installation
composer require ycloudyusa/y_pef_schedule
drush en y_pef_schedule lb_simple_schedule
- Install as you would normally install a contributed Drupal module. For further information, see
Installing Drupal Modules.
- Enable the module by navigating to Admin > Extend (
/admin/modules) in your Drupal admin interface, then enabling “Y PEF Schedules Admin tool” and “LB Simple Schedule”.
Configuration
- Configure the calendar settings at Admin > YMCA Website Services > Settings > Schedules calendar settings (
/admin/openy/settings/schedules-calendar) - Go to Admin > Content > Schedules Calendar (
/admin/openy/branch-schedules) and select a branch.
After choosing a branch, you can view the calendar. The calendar features include:
- Viewing events in weekly or daily format.
- Viewing the main information of the event (by clicking on the event).
- Creating a new event (using the Session Content Type).
- Updating existing events.
- Downloading the schedule in PDF format.
- Filtering results by categories.
Showing the calendar on a page
Once you have added sessions to a calendar, you can add the calendar block to a Layout Builder page to display on the site. Ensure the “LB Simple Schedule” is enabled first.
- Edit the Layout of a Layout Builder page (Branch, Landing Page, etc).
- Create or find a section, then Add Block.
- Choose Add custom/content block then Simple Schedule.
- Add a Title and choose a Branch to populate the calendar.
- Save the block and the page.
Customization
A few options are available for advanced customization of the calendar.
Retrieving Events
The module provides controllers to handle AJAX requests for fetching events. To create a custom request, use the following route in your JavaScript code:
axios.get('/fullcalendar-api/get-event-data-date-range/{location}/{start}/{end}/{category}')
  .then(response => {
    const events = response.data;
    // Process the received events as needed
  })
  .catch(error => {
    console.error('Error fetching events:', error);
  });
Replace {location}, {start}, {end}, and {category} with the appropriate values.
Creating Events
The fullcalendar-app component allows users to create events interactively. When a date is clicked, a modal form is displayed for users to enter event details such as title, category, time, and date.
To customize the form or extend the functionality, refer to the
Vue.js component documentation and customize the handleDateClick and createEvent methods in the fullcalendar-app component.
Troubleshooting
Known issues
- After creating a series of events, it is created, but only one event is displayed in the calendar, the page must be refreshed to see the correct data
- The color is fixed to the session and not to the category
- PDF format is A3
3 - Traction Rec Integration
Instructions for configuring and importing data from Traction Rec into the Program Event Framework
Via
Traction Rec Integration (ycloudyusa/openy_traction_rec)
This module provides YMCA Website Services integration with the
Traction Rec CRM.
Installation
Require this module:
composer require ycloudyusa/openy_traction_rec
Then enable the necessary modules and submodules:
drush en openy_traction_rec openy_traction_rec_import openy_tr_activity_finder
Usage
The main module itself provides only API that helps fetch data from TractionRec. More specific functionality is provided in submodules:
YMCA Website Services Traction Rec: PEF import provides PEF migrations.YMCA Website Services Traction Rec: Activity Finder extends YMCA Website Services Activity Finder with the new fields and logic.
See
<a href="modules/openy_traction_rec_import/README.md">modules/openy_traction_rec_import/README.md</a> for details on how to import content once configuration is complete.</p>
Configuration
Create a Connected App in Salesforce
- Create a new private key and X509 certificate, customizing the
subj options in the command to suit your organization. (Seethe manual for openssl-req to understand the options here.)
openssl req -x509 -noenc -sha256 -days 365 \
 -keyout traction_rec.key \
 -out traction_rec.crt \
 -subj "/C=US/ST=Illinois/L=Chicago/O=My YMCA/OU=Org/emailAddress=youremail@example.com"
- The email address in the certificate does not need to match the email on the Connected App.
- The certificate must be renewed yearly (or after the set number of
--days). We recommend you set a reminder in order to prevent unwanted failures.
- In Salesforce > Setup > App Manager, create a New Connected App.
- Set a Name and Email.
- The Contact Email is not used for authentication.
- Check Enable OAuth Settings
- Set the callback url as the base URL of your site
- Check Use digital signatures and upload the X509 certificate (
.crt) created above. - Ensure the app has the following Selected OAuth Scopes
- Full access (full)
- Manage user data via APIs (api)
- Manage user data via Web browsers (web)
- Perform requests at any time (refresh_token, offline_access)
- Check these options:
- Require Proof Key for Code Exchange (PKCE) Extension for Supported Authorization Flows
- Issue JSON Web Token (JWT)-based access tokens for named users
- Uncheck all other options in the OAuth section.
- Save the Connected App
- Once the app is saved, you will need to get the Consumer Details:
- In the “My Connected App” screen that appears once you save (or via Setup > App Manager), click Manage Consumer Details.
- Save the Consumer Key and Consumer Secret for the next step.
- Create a Profile OR Permission Set to assign permissions to your app. We recommend using a Permission Set as those are the option recommended by Salesforce.
- Your Traction Rec support team should be able to deploy the
Traction Rec Activity Finder Permission Set from their dev1 instance. If this Permission Set is deployed, proceed straight to the User creation step. To create a Permission Set from scratch: - Create a Profile:
- You must do this before creating a user.
- Setup > Users > Profiles > New
- When asked what Existing Profile to clone from, select Standard User or Standard Platform User. Be sure to note the User License connected to the target profile.
- In the very large configuration screen, click Edit, then:
- Save those changes.
- Create a new User with the new Profile or Permission Set:
- Confirm your Connected App, Profile, and User are connected:
- Go to Setup > Apps > Connected Apps > Manage Connected Apps and choose your new app. Assign the Profile or Permission Set that contains your new user if it does not already show under the relevant section.
- Click Manage Profiles or Manage Permission Sets
- Search for your Profile or Permission Set and Save.
- In the Connect App Detail, click Edit Policies:
- Under OAuth Policies > Permitted Users choose Admin approved users are pre-authorized.
- Check Issue JSON Web Token (JWT)-based access tokens.
- Save the Connected App details.
When the process is complete, you should have the following relationships between the User, Permission Set OR Profile, and Connected App:
- the API User should be assigned the Permission Set OR Profile.
- the Connected App should be assigned the same Permission Set OR Profile.
Review all of these steps carefully. Missing any of them can result in an inability to query the API.
Salesforce permissions
The Salesforce integration Permission Set OR Profile should have read access to all fields in the following objects:
- Course Options
- Courses
- Course Session Options
- Course Sessions
- Locations
- Products and Discounts
- Program Categories
- Program Category Tags
- Programs
- Sessions
If using a Profile, it should also have the following Systems Permissions:
- Apex REST Services
- View Restriction and Scoping Rules
- Update Consent Preferences Using REST API
- Go to Admin > Configuration > System > Keys (
/admin/config/system/keys) and create a new key to store the private key created above. - Go to Admin > YMCA Website Services > Integrations > Traction Rec > Traction Rec auth settings (
/admin/openy/integrations/traction-rec/auth) to configure the keys & secrets provided by Traction Rec.- Add the Consumer key and Consumer Secret from Manage Consumer Details in Salesforce.
- Add the User connected to the Connected App.
- This is the Username of the User, not the Contact email.
- Enter a Login URL.
- This will most likely be
https://login.salesforce.com
- Set the Services base URL and REST API Base URL as per their descriptions.
- Ensure the REST API Base URL responds to
curl -I with a 200 response. Replace URLs like *.lightning.force.com with *.my.salesforce.com because the lightning url may result in a redirect, which will cause an authentication error, like ([@"message":"Session expired or invalid","errorCode":"INVALID_SESSION_ID"]).
- Set the Community URL based on the publicly accessible registration links.
- This may be something like
https://my-ymca.my.site.com - The URL can be found in Salesforce under Setup > Digital Experiences > All Sites.
- Choose the key as configured above.
Mapping
The TractionRec importer pulls data from
<a href="#salesforce-permissions">many Traction Rec Objects</a> (see
TractionRec.php for the full queries):
Object Mapping
The fetcher outputs these files:
classes.json - from Courses- Maps to both Activities and Classes. Since TREC does not have this distinction, information in the resulting Activities and Classes in Drupal is duplicated.
locations.json - from Locations- This file is unused, but Locations map to Location via the Session import.
program_categories.json - from Program Category Tagsprograms.json - from Programs- Maps to Program Subcategory.
sessions.json - from Course Options
Note: Traction Rec’s labels for “Programs” and their child groupings are different:
- Traction Rec: “Program Category” is the parent of “Program”.
- Drupal: “Program” is the parent of “Program Subcategory”.
Mapping to Drupal fields
Those files are then imported into Drupal content via
importers (in config items that start with migrate_plus.). The import goes as follows:
- Drupal Content Type (bundle)
Salesforce/TractionRec source field → Drupal destination field
- Program - from
programs.json / TREC Program Categories- Id → id
- Name → Title
- Available → Published (
status)
- Program Subcategory - from
program_categories.json/ TREC Programs- Id → id
- Name → Title
- Program → Program (
field_category_program) via a lookup to the Programs import - Available → Published (
status)
- Activity - from
classes.json / TREC Courses- Id → id
- Name → Title
- Program/Id → Program Subcategory (
field_activity_category) via a lookup to the Program Subcategory import - Available → Published (
status)
- Class - from
classes.json / TREC Courses- Id → id
- The Class Id will also be used to set the Activity (
field_class_activity)
- Name → Title
- Program/Id → ignored
- Description/Rich Description → Description (
field_class_description)- If a Rich Description is set, it will be used, otherwise the Description field will be used.
- Available → Published (
status)
- Session - from
sessions.json / TREC Sessions- Course_Option/Name → Title
- Course_Option/ID → id
- Also used to generate the Registration link URL using the Community URL set in Traction Rec auth settings (
/admin/openy/integrations/traction-rec/auth).
- Course_Session/Course/Id → Class
- Course_Session/Course/Name → Course
- Course_Session/Course/Description & Rich_Description → Description (
field_class_description)- If a Rich Description is set, it will be used, otherwise the Description field will be used.
- Course_Option/Start_Date → Session Time > Start date
- Course_Option/Start_Time → Session Time > Start time
- Course_Option/End_Date → Session Time > End date
- Course_Option/End_Time → Session Time > End time
- Course_Option/Day_of_Week → Session Time > Days
- Course_Option/Age_Min → Min Age (
field_session_min_age) converted to months - Course_Option/Age_Max → Max Age (
field_session_max_age) converted to months - Course_Option/Location/Name → Location (
field_session_location)- Location Name is used as a backup in case the Location Mapping does not match.
- Course_Option/Location/Id → Location (
field_session_location)- Location ID is used to attempt to match a location in the Location mapping in the Traction Rec importer settings (
/admin/openy/integrations/traction-rec/importer)
- Course_Option/Instructor → Instructor (
field_session_instructor) trimmed to 255 characters - Course_Option/Available_Online → Online registration (
field_session_online) - Course_Option/Available → Published (
status) - Course_Option/Register_Online_From_Date → not used
- Course_Option/Register_Online_To_Date → not used
- Course_Option/Capacity → Initial Availability (
field_availability) - Course_Option/Total_Capacity_Available → Initial Availability (
field_availability) - Course_Option/Unlimited_Capacity → if set, overrides Capacity and sets Initial Availability (
field_availability) to 100 - Course_Option/Unlimited_Waitlist_Capacity → Wait list Unlimited Capacity (
waitlist_unlimited_capacity) - Course_Option/Waitlist_Total → Wait list capacity (
waitlist_capacity) - Course_Option/Product/Price_Description → Price description (
field_price_description) - Course_Session/Id → Class (
field_session_class) via a lookup to the Class import
Data Model
This module assumes a Traction Rec “standard” data model in its queries. Any deviations from this model will require overriding the queries in src/TractionRec.php.
This model contains a subset of the fields in Traction Rec that are relevant to our usage. All entities have more fields than listed.
Field types are taken from Salesforce’s Setup > Object Manager > {Entity} > Fields & Relationships.
- Number field options are:
number(length_decimal places)
erDiagram
    Program_Category__c {
        id Id
        text(80) Name
    }
    Program__c {
        id Id
        text(80) Name
        checkbox Available__c
        textArea(255) Description__c
    }
    Program_Category_Tag__c {
        id Id
        autoNumber Name
        lookup(Program) Program__c
        lookup(Program_Category) Program_Category_c
    }
    Course__c {
        id Id
        text(80) Name
        checkbox Available__c
        text(128) Code__c
        longTextArea(640) Description__c
        lookup(Program) Program__c
        richTextArea Rich_Description__c
    }
    Course_Session__c {
        id Id
        text(80) Name
        checkbox Available__C
        text(128) Code__c
        lookup(Course) Course__c
        longTextArea(640) Description__c
        number(18_0) Num_Option_Entitlements__c
        lookup(ProductAndDiscount) Product__C
        richTextArea Rich_Description__c
        sum Total_Option_Capacity__c
        formula(number) Total_Option_Capacity_Remaining__C
        sum Total_Option_Registrants__c
        count Total_Options_Available__c
    }
    Course_Option__c {
        id Id
        text(80) Name
        number(3_1) Age_Max__c
        number(3_1) Age_Min__c
        checkbox Available__c
        number(18_0) Capacity__c
        picklist(multiSelect) Day_of_Week__c
        date End_Date__c
        text(8) End_Time__c
        text(128) Instructor__c
        lookup(ProductAndDiscount) Product__c
        number(18_0) Registration_Total_c
        longTextArea(3500) Setup_Notes__c
        number(3_0) Setup_Time_Required___c
        date Start_Date__c
        text(8) Start_Time__c
        longTextArea(3500) Tear_Down_Notes__c
        number(3_0) Tear_Down_Time_Required__C
    }
    Course_Session_Option__c {
        id Id
        autoNumber Name
        lookup(CourseOption) Course_Option__c
        masterDetail(CourseSession) Course_Session__c
        checkbox Option_Available__c
        number(18_0) Option_Capacity__c
        number(18_0) Option_Registration_Total__c
    }
    Program_Category__c ||--|{ Program_Category_Tag__c : ""
    Program__c ||--|{ Program_Category_Tag__c : ""
    Program__c ||--|{ Course__c : ""
    Course__c ||--|{ Course_Session__c : ""
    Course_Session__c ||--|{ Course_Session_Option__c : ""
    Course_Option__c ||--|{ Course_Session_Option__c : ""
Using Google Tag Manager (GTM)
By
integrating Google Tag Manager (GTM) with your Salesforce Community, you can enable your marketing team to manage the deployment of marketing tags and tracking pixels, without relying on a developer to modify any code.
You may also want to
configure cross-domain tracking on your Drupal site.
Import
The module allows you to synchronize classes and programs from the
Traction Rec CRM to the YMCA Website Services Program Event Framework (PEF).
It uses Migrate API to import data fetched from Traction Rec and provides Drush commands and a configuration UI.
The import process consists of 2 drush commands:
openy-tr:fetch-all this command fetches required data from Traction Rec and saves it to JSON files.
openy-tr:import the command migrates fetched JSON files to YMCA Website Services and creates sessions, classes, activities, categories and programs.
You can run the commands manually for one-time import or add both to cron jobs.
Other available drush commands:
openy-tr:rollback - Rolls back all imported nodes.
openy-tr:reset-lock - Resets import lock.
openy-tr:clean-up - Removes imported JSON files from the filesystem.
openy-tr:quick-availability-sync - Sync total availability data for sessions.