These instructions explain how you can run tests.
Behat
Requirements
- Ansible 1.9.4+ http://docs.ansible.com/ansible/intro_installation.html
- Docker https://docs.docker.com/engine/installation/
Run full test suite
Execute command
$ cd profiles/contrib/openy
$ sh runtests.sh
Open http://site.com/profiles/contrib/openy/build/reports/behat in browser.
Run selenium container + Behat tests in usual way
In order to run only selenium container + behat in usual way:
$ cd profiles/contrib/openy
$ sh runtests.sh --tags run_selenium
$ bin/behat
Stop selenium container
In order to stop selenium container:
$ cd profiles/contrib/openy
$ sh runtests.sh --tags stop_selenium
If necessary, edit behat.local.yml to match your environment.
Visual debugging - Video
When you develop JS tests, it’s important to see what’s going on the Selenium screen. You can easily see this during development.
- Install https://www.realvnc.com/download/viewer
- Run selenium using command
$ cd profiles/contrib/openy
$ sh runtests.sh --tags run_selenium
- Open installed VNC Viewer and connect to the server with IP
192.168.56.132:5901
- Password = secret
- Run tests and you should see everything that is performed by behat tests in VNC client
$ bin/behat
Custom Behat functionality
- Create entities in table forms, with key to use in reference and reference entities by key.
- KEY is optional, and must be all CAPS.
- Taxonomy
Given I create "taxonomy_term" of type "color" with key for reference: | KEY | name | field_color | | Blue | Blue | 0000FF | | Red | Red | FF0000 | - Paragraphs
Given I create "paragraph" of type "small_banner" with key for reference: | KEY | field_prgf_headline | field_prgf_color | | banner1 | Headline 1 | Blue | | banner2 | Headline 2 | Red | - Media entities
Given I create "media" of type "image" with key for reference:
  | KEY       | name            | file         |
  | gallery_1 | Gallery image 1 | gallery.png  |
  | gallery_2 | Gallery image 2 | gallery2.png |
  | gallery_3 | Gallery image 3 | gallery3.png |
- Create nodes in table forms, with key to use in reference and reference entities by key.
- KEY is optional, and must be all CAPS.
- Basic create
Given I create "landing_page" content: | KEY | title | field_lp_layout | field_content | | landing_1 | Test Landing 01 | one_column | banner1 | | landing_2 | Test Landing 02 | one_column | banner2 | - Vertical field table
Given I create large "landing_page" content: | KEY | landing_3 | landing_4 | | title | Test Landing 03 | Test Landing 04 | | field_lp_layout | one_column | one_column | | field_content | banner1 | banner2 | - Create & view immediately
Given I view a "landing_page" content: | KEY | landing_5 | | title | Test Landing 05 | | field_lp_layout | one_column | | field_content | banner1 | - Multiple referenced entities by key on a field.
Given I create "landing_page" content:
  | KEY       | title           | field_lp_layout | field_content    |
  | landing_6 | Test Landing 06 | one_column      | banner1, banner2 |
Example Address and Latitude + Longitude
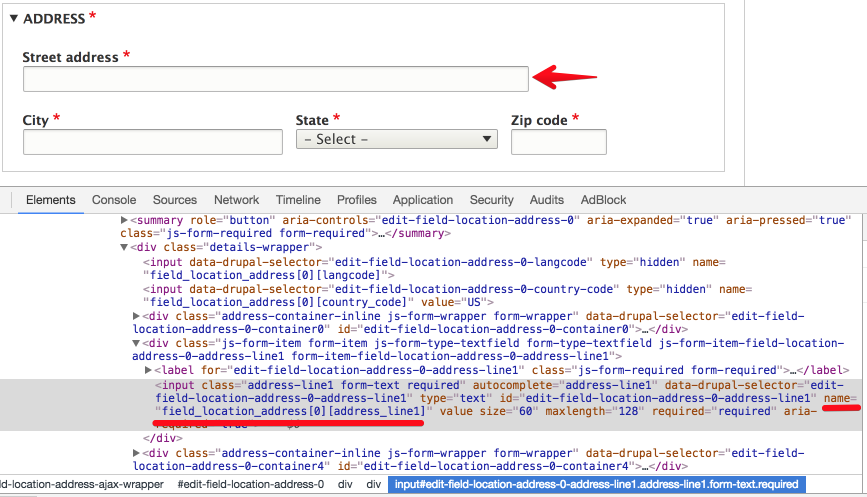
Fields with sub field/columns:
The machine name and columns can be found in the form markup in the field name property.
 The first portion,
 field_location_address represents the Drupal field machine name, while the second array key address_line1 represents the column.
- Add Address
Given I view a "branch" content: | title | Branch Example | | field_location_address:country_code | US | | :address_line1 | Main road 10 | | :locality | Seattle | | :administrative_area | WA | | :postal_code | 98101 | - Add Latitude and Longitude
Given I view a "branch" content:
  | title                          | Branch Example 2 |
  | field_location_coordinates:lat | 47.293433        |
  | :lng                           | -122.238717      |
  | field_location_phone           | +1234567890      |
