Under the hood, both of these applications use the Activity/Class/Session Content Types and the YMCA Sync module to import content from an external API. These pieces together comprise the “Program Event Framework” which is highlighted in a case study on drupal.org.
This is the multi-page printable view of this section. Click here to print.
Schedules
1 - Activity Finder
Activity Finder combines data from the Activity, Class, and Session content types into an interactive tool that can be used with Paragraphs or Layout Builder pages.
Out-of-the-box, YMCA Website Services’s Activity Finder integrates with Daxko, ActiveNet, and Personify. Configuring these integrations is mostly user-friendly, but often is supported by a partner development team. Any other CRM will require custom developer work.
See the Program Event Framework developer docs for a full list of integrations.
Block configuration
When you add the Activity Finder block to a page, you have a number of options. These are in addition to the configuration at Admin > YMCA Website Services > Settings > Activity Finder Settings (/admin/openy/settings/activity-finder). See
the Activity Finder module README for more information.
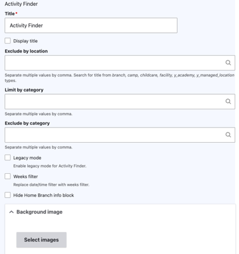
- Location & Category Filters - Restrict this block to show sessions from only certain Locations or Categories. ‘Limit’ will show only the specified options. ‘Exclude’ will remove the specified options. Generally you should choose either Exclude or Limit, not both.
- Limit by location - Only show sessions at specific locations in the results.
- Exclude by location - Remove sessions at specific locations from the results.
- Limit by category - Only show sessions related to specific Program Subcategories in the results.
- Exclude by category - Remove sessions related to specific Program Subcategories from the results.
- Legacy mode - Shows some data as it was in the previous version of Activity Finder (v3):
- Disables bookmark functionality on the results screen.
- Doesn’t display the age indicator in the result card of activities.
- Changes the days + times wizard step. Displays only days of week, but not times of each day (doesn’t support DaysTimes filter)
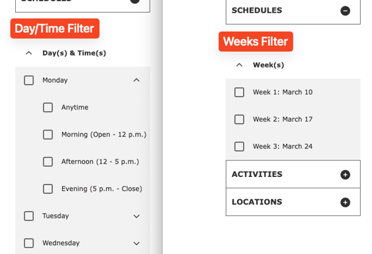
- Weeks filter - Changes the Day/Time filter to use custom defined Week filters.
- Additional filters - These filters are off by default, but can be enabled in the Block Configuration.
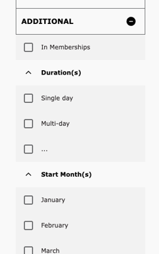
- Start Month - Filters based on the month in the Session Time field.
- In Membership - Shows Sessions that have In membership checked.
- Duration - The length of the Session. This is configurable in the Activity Finder settings (
/admin/openy/settings/activity-finder) and defaults to:- Single day
- Multi-day (up to 5 days)
- Weekly (up to 3 weeks)
- Monthly (up to 5 weeks)
- Season (up to 12 weeks)
- School year (~9 months)
- Full year
- Hide Home Branch info block - Disables functionality related to the user’s selected home branch.
- Background image - An image that’s displayed in the background of the banner above Activity Finder.
Front-end
Once the Activity Finder Paragraph or Activity Finder Layout Builder Block has been added to a page, users can see its content.
Filters
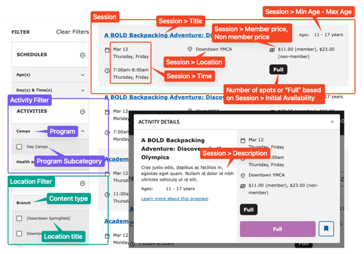
- Schedules - Filters by a number of facets, which are configurable in the Block Configuration or Activity Finder settings.
- Age(s) - Filters based on the Min Age and Max Age. Age ranges are configurable in the Activity Finder settings (
/admin/openy/settings/activity-finder). - Day(s) & Time(s) - Filters by the time of date on specific days of the week. This filter has no configuration.
- Weeks - Replaces date/time filter when Weeks filter is selected in the Block Configuration. See configuration requirements above.
- Age(s) - Filters based on the Min Age and Max Age. Age ranges are configurable in the Activity Finder settings (
- Activities - Program Subcategory filters grouped by Program.
- Locations - Location filters grouped by Content type.
See Block Configuration for more detail on other available filters.
Results
The filtered results in the Activity Finder app are a list of Sessions that meet the given filter criteria.
Each row of results contains:
- The Session Title.
- The Session Time, which contains a date, days of the week, and times.
- The Session Location
- The Session Min/Max Age
- The Member Price and Non-member price
- An indication of the number of spots available, from the Initial Availability field.
Clicking on the row will bring up a pop-up with further details:
- The Session Description
- A “Learn more” link and “Register” button which both go to the URL in the Session Registration Link field.
Additional topics
Allowing UTM codes in Activity Finder
UTM codes can be used to track the effectiveness of marketing campaigns. Activity Finder uses query strings as filters, but as of version 4.2.0 it will also maintain UTM codes in the URL.
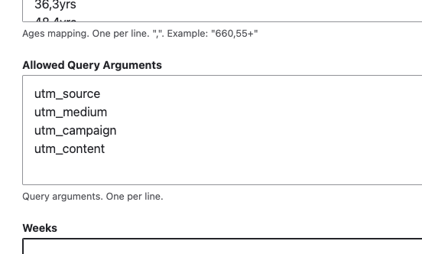
Activity Finder begins with a number of preset arguments, and those can be modified at Admin > YMCA Website Services > Settings > Activity Finder Settings (/admin/openy/settings/activity-finder) in the Allowed Query Arguments field.
Once those settings are saved, you can visit an Activity Finder page with UTM codes attached, for example:
https://example.com/activity_finder?step=results&selectedAges=24&selectedLocations=1541437&selectedActivities=2786027,2786083&utm_source=promotional_member&utm_medium=email&utm_content=button_register_now&utm_campaign=fall_group_swim_lessons_2021
and see that the codes are maintained as the filters are changed.
2 - Group Schedules
Sometimes called “Group Exercise” or “Group Schedules”, the Repeat Schedules block provides a similar view to Activity Finder, but focuses on recurring, often drop-in classes. You can see an example of this on our sandbox site.
Developers can find more information in
drupal/openy_repeat and
Program Event Framework.
As of August 2024, the Schedules have an updated design with improved functionality and user experience. The improved design will also respond to the selected colorway and page styles.
Using Group Schedules
- Repeat Schedules Paragraph
- Repeat Schedules Layout Builder
- Available with
openy_repeat2.2.0 and above via the Repeat (Group) Schedules (lb_repeat_schedules) module.
- Available with
Block configuration
After you add the Paragraph or Block to a page, configure the options:
- PDF Schedule link - a link to a manually generated PDF as an alternative to the automatically generated one.
- Clear All link - where the user is directed when they use the “Clear all” link.
- Limit by category - choose categories with autocomplete to only show certain categories.
- Filters - choose the filters that show up in the sidebar.
- Limit by Location - choose a location to only show events from that location.
- Display instructor
- Display end time
- Categories Exclude - exclude any programs that are tagged with specific categories.
- PDF only view - only show the PDF link and not the schedule.
Front-end
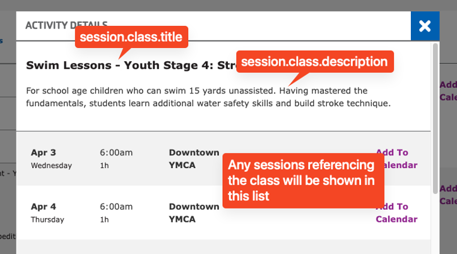
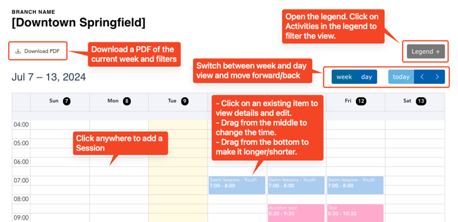
Data from Sessions, Classes, and Activities are all used to form the Repeat Schedules. Here’s what shows up where. Fields are noted with their relationships, so session.class.activity.title means “the title of the Activity referenced by the Class referenced by the Session”.
Fields used in the table view:
Fields used in the popup view:
3 - Simple Schedules
See PEF Schedules for installation instructions.
Once you install the PEF Schedules module, you will be able to build schedules and add sessions via a calendar-based builder.
Before you start
Create schedule groupings
The Schedule editor allows Content Editors to create Sessions on a “WYSIWYG” calendar interface. As described in the PEF data model, Sessions require Classes, which require Activities, which require Program Subcategories, which require Programs.
flowchart LR
    subgraph "PEF Relationships"
        direction LR
        Session -- requires --> Class
        Class -- references --> Activity
        Activity -- references --> PS
        PS -- requires --> Program
        PS["Program Subcategory"]
    end
You will need to create at least a Class and Activity to start adding events to the calendar. Go to Admin > Content > Add Content (/node/add) to start adding items.
If you have preexisting content for any of these content types you can use them here. You may first need to configure the Activity Color for existing Activities.
Activity colors
PEF Schedules adds a new Color field to Activities which is used to style the categories on the calendar.
The Color field takes a hex value (#XXXXXX where X is a hexadecimal character (0-9, a-f)). We recommend using colors from the
Brand Standard Color Wheel. The default color is configurable in the Calendar Settings. We recommend selecting dark tones from the color wheel. as the item titles are displayed with white text.
Calendar settings
Settings for the calendar are configurable at Admin > YMCA Website Services > Settings > Schedules calendar settings (admin/openy/settings/schedules-calendar).
Options include:
- Slot settings - These relate to creating events on the calendar.
- Slot Duration - The default length of each time slot.
- Snap Duration - The default granularity to which events “snap” when clicking and dragging on the calendar.
- Slot Label Interval - The interval between time labels on the calendar’s time axis.
- Time Settings - These help make the calendar display more relevant to your user’s needs.
- Min Time - The earliest time that is visible on the calendar view.
- Max Time - The latest time that is visible on the calendar view.
Manage schedules
Once everything is configured, you can start managing schedules. See a list of available schedules at Admin >
Content > Schedules Calendar (admin/openy/branch-schedules). Click on one of the options to open the editable schedule.
When in the schedule, you can:
- Click Download PDF to download a PDF of the current display.
- Click Legend to open the legend, then click items in the legend to filter the view.
- Use the Week/Day buttons to filter and change the view or page between weeks/days.
- Click anywhere in the calendar to add a session.
- Click on an existing item to view its details and edit.
- Drag from the middle of an item to change its time.
- Drag from the bottom of an item to change its duration.
Create sessions
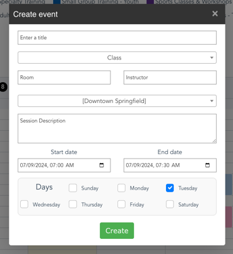
When creating a session from the schedule, you’ll see a simplified version of the Add Session (/node/add/session) form.
- Enter a Title (required).
- Select a Class from the dropdown (required).
- Enter a Room and/or Instructor (optional).
- Choose a Location (required).
- Add a Session Description (optional).
- Set a Start date/time and End date/time (required). The time values will determine when on each day the session happens. The dates will determine the start and end of its recurrence if it happens across multiple days.
- Set the Days on which the Session recurs during the duration of the dates set above (required).
Display schedules
Once content is added to the schedule, you have several options for showing it to users:
- Place the Simple Schedule block on any Layout Builder page.
- All items added via the Simple Schedule will be shown in Activity Finder or Group Schedules. Follow the directions on those pages to configure the respective components and add them to a page.
- Download the schedule PDF and upload it somewhere on your site.
