After members login to your website, they can browse a diverse selection of gated content—on-demand videos, written content, and live events—from any device of their choosing.
Below are links to various videos and documents, depending on how you prefer to learn, on how to do some of the most basic set up and management of your new Virtual Y environment.
1 - Building Blocks & Basics
Virtual YMCA is based on Open Y and was originally built as an extension for Open Y sites.
Virtual YMCA uses the same content editing tools as Open Y, except what you get out-of-the-box will be different than in Open Y.
Content Types
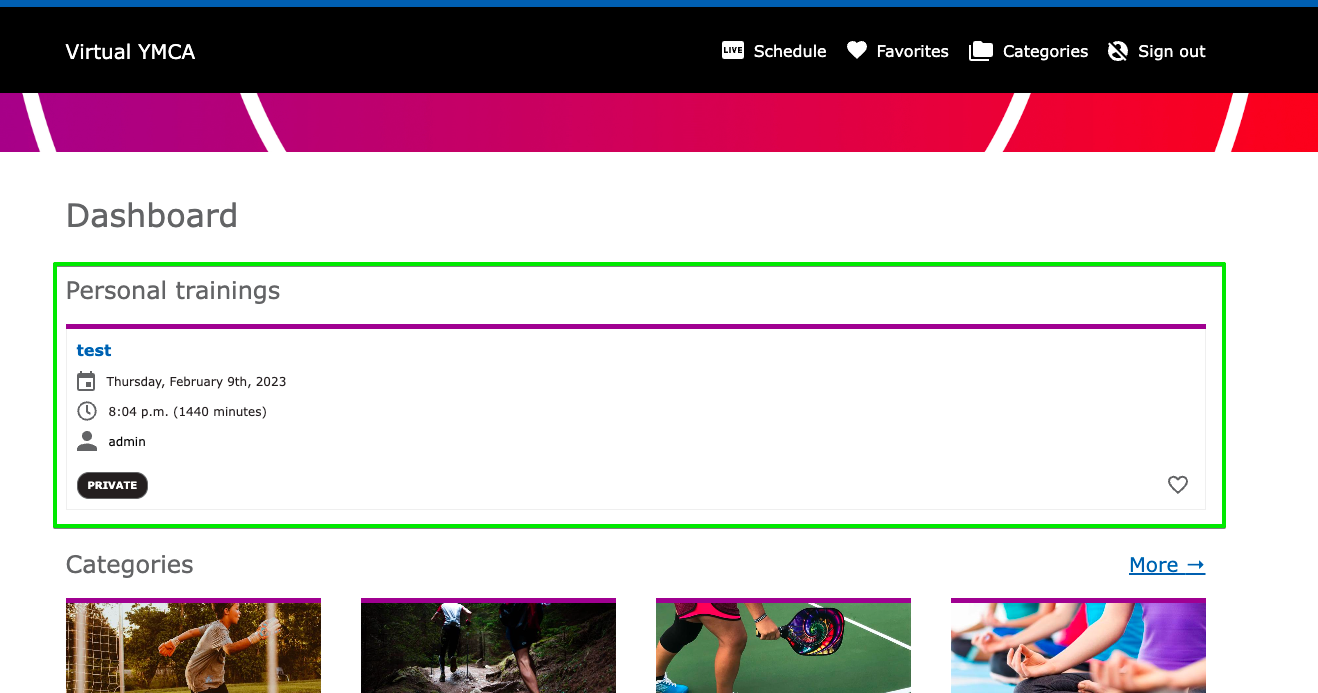
Virtual YMCA comes with four content types behind the login that are exclusive to members.
Virtual Y Video
Bring the Y to your members when they’re away. Provide on-demand classes, activities for kids, and other video content. Great for health seekers, families and Active Older Adults.
Bring your popular classes to your members live! Best for live events with little to no interaction with the audience.
Add Live Streams individually or on a recurring basis. They differ from Virtual Events in that the video will be embedded within the Virtual Y site.
Integrates with: YouTube and Vimeo
Virtual Events
Bring group fitness and other live events to your member with live, virtual events. Great for class with interaction with Y instructors and personal/small group training.
Add Virtual Events individually or on a recurring basis. They differ from Live Streams in that the user will be directed to an external video link.
Integrates with: Any URL/link, including GoToMeeting, Google Meet, Microsoft Teams, Zoom, IG Live and Facebook
Blog Posts
Do your members want to work out on their own but don’t know which workout they want to choose? Use written content to provide members workouts, recipes, or activities.
Add Virtual Y Blog Posts can be added via the standard Add Content list or menu.
No integrations required.
2 - Authentication Providers
The options available to associations to gate your content is dependent on your Customer Management System. Currently the following options may be used to gate content within the Virtual Y website.
Personify
Single Sign On (SSO)
You may require members to log into their account within the Personify CRM system.
Daxko
Single Sign On (SSO)
You may require members to log into their account within the Daxko CRM system.
Note, Daxko API access is required. Daxko charges an API usage fee.
Barcode Validation
You may require members to enter their bar code before accessing the site. Virtual Y will validate the barcode with Daxko prior to granting access.
You may require members to log into their account within the ReClique CORE CRM system.
CSV File Uploads
CSV Upload without email verification
An association may upload a membership CSV file indicating what members may access the gated content. Members provide their email address and the Virtual Y site will validate a match before granting access.
CSV Upload with email verification
An association may upload a membership CSV file indicating what members may access the gated content. Members provide their email address and the Virtual Y site will require members access their email and click a link to gain access to the gated content.
2.1 - Daxko Barcode Authentication
Open Y Gated Content (Virtual Y)
release 0.13 includes a new authentication provider to support Daxko Virtual Areas. This will allow associations using Daxko to set up Virtual Area that enable members to access Virtual Y content using only their member barcode!
Instructions for setting up Virtual Areas are in
Daxko’s documentation. If you need assistance configuring Virtual Areas, Daxko’s support team can assist you in setup:
support@daxko.com
Configuration
Enable Daxko Barcode Virtual YMCA integration
OPTIONAL (but highly recommended): configure reCaptcha settings at /admin/config/people/captcha/recaptcha.
Add your validation secret and form url and check help messages at /admin/openy/virtual-ymca/gc-auth-settings/provider/daxkobarcode.
Save your settings.
Set Daxko Barcode as your main authorization plugin at the Virtual YMCA settings: /admin/openy/openy-gc-auth/settings.
Once enabled, the module enables granular configuration to messages that users will receive on the page. It allows changing “Barcode” to something different, like “Member ID”, and allows adding help text to assist members in finding their ID. It also allows for global help text to direct members to help channels in case they’re unable to log in.
Once the module is enabled, members will be presented with the appropriately titled field to log in to Virtual Y.
Upon success the user will be logged in to Virtual Y. Upon failure the failure state will be returned along with a help message provided by the association.
Notes
Members with a Balance Due
Anyone with a balance due in Daxko doesn’t have access to Virtual Y [via Daxko Barcode]. A lot of the accounts with balances are families with memberships who receive state scholarships for child care. The balance in Daxko is the portion the state pays, so it’s a bit of a “fake” balance. Any way for us to allow any ACTIVE member to use [Virtual Y], regardless if they have a balance or not?
The fix:
There’s a setting on the Daxko Operations virtual area at Membership > Virtual Area > Virtual Y > Edit that you can check/uncheck for “Block access when balance due.” You can uncheck that and it should let the member access the virtual area.
2.2 - ReClique SSO Configuration
The ReClique Core API enables check-in access by specifying member Email address. Following are the steps necessary to fully configure the ReClique Provider.
Acquire ReClique Core API Access
To get started, you will need to do the following activities in the ReClique CORE portal, while logged in as a YMCA super admin user:
Locate and note your YMCA association’s YMCA ID, known within the ReClique CORE documentation as the “Association Slug”.
Create a separate user for executing the ReClique CORE authentication API, and grant this user API level access
In detail:
Log into the ReClique Core portal using a user with YMCA super administrator role.
Click “Profile” in the top-right corner of the CORE portal.
The YMCA ID is the non-numeric part of the “Association Slug” in front of the numeric user id. Please note this value for use in the Verification URL. In this example, the text midtn is this association slug value, and is what is needed for the YMCA ID.
Click “Users” from the navigation menu (Users > Add New User)
Select the “+ Add User / Staff” button.
Create a stand-alone user for the purpose of executing API calls only. A suggested name is virtual_y, but any suitable name can be used.
Assign this user the API Access role by selecting “Use Core API” in the Other list of role options.
Configure the Virtual Y ReClique Provider
For the Virtual Y site to communicate with the ReClique Core API, you’ll need to configure the ReClique provider. Configuring the ReClique provider is quick and easy.
Navigate to the Gated Content Auth Setting Page at Manage > Virtual Y > Virtual YMCA Settings > GC Auth Settings
The GC Auth Settings page, when loaded, will look like the following:
Find the ReClique Provider option and click the Edit Action
Enter Your ReClique Provider Settings.
The ReClique Provider configuration page allows specification of permission mappings, the settings for accessing the ReClique CORE authentication API, and Email Verification settings.
Specify Permission Mappings
This is used for User Segmentation. User Segmentation will allow YMCAs to segment content to particular Virtual Y roles based on membership types. Refer to documentation from the Open Y Community for more information about
Setting up user segmentation.
Add ReClique CORE API settings
Here, you’ll add the values needed to connect to the ReClique Core API.
Field
Value
Verification URL
The API endpoint provided by ReClique to verify member logins. It takes the form https://{Y_ID}.recliquecore.com/ api/v1/members/virtual_y/?Email= (This is the Production verification URL)
Authentication login
The login for the dedicated user created with ‘Use Core API’ access in the ReClique Core portal.
Authentication password
The password for the dedicated user created with ‘Use Core API’ access in the ReClique Core portal.
ID field text
The text to be displayed on the Virtual Y login form. Default value is “Enter your Email:”
Specify the Email Verification options
This will enable a one-time login link to be sent to the member’s email for verification. Here, you can configure the length of time the login link will last before needing to generate another, email verification text, and message displayed to the member with instructions on how to proceed with logging into the Virtual Y site.
Specify the Verification Message
This is the message the member will see when logging in if they are Inactive. The phone number must be added at the very least.
After configuring the ReClique provider, click “Save”.
From the GC Auth Settings page, make sure only “ReClique Provider” is selected and click, “Save”.
Your ReClique Provider is now fully configured and is ready for use.
To test, logout from the admin portal. You should now see, from the Home Page, your new login form configured ready to accept input.
If a valid Email Address is entered and the member is Active, the member will be allowed access to your gated content (videos, blog post, virtual meetings).
3 - Video Support & Hosting
Virtual Y supports embedded videos from the following sources. The supported source is dependent on the content type:
(On-demand) Video
YouTube
Vimeo
Live Stream
YouTube
Vimeo
Virtual Meeting
As a “Join” button
any external link, including Facebook
Zoom meetings (embedding is no longer supported)
Video Provider Specifics
Each video provider has its benefits. We’ve provided this list to help you decide where to start.
YouTube videos that are smaller than 1280x720px (aka “720p”) may not display a thumbnail properly in Virtual Y. If you upload a large (greater than 1280×720px) thumbnail via YouTube’s video editor that should resolve this issue on Virtual Y (until
this issue is resolved).
Setting up a
Brand account for your Y is a good first step to using YouTube for your videos.
The requirements for embedding YouTube Live Streams may change often. Previously this has either required having more than 1000 subscribers on your channel, turning on “Monetization”, etc. It may, at times, be more expedient to use Vimeo for Live Streaming.
Upload and bandwidth limits based on account type.
Truly gated videos with
domain-level privacy. Domain restrictions are NOT RECOMMENDED if you plan on sharing your content with other Y’s using Virtual Y’s “Shared Content” feature.
In order to facilitate content sharing, we recommend using the Hide this video from vimeo .com privacy option combined with Enable people to embed this video on any site.
Review all of Vimeo’s privacy options.
Most associations have been buying the
“Premium” level to get access to unlimited live streaming.
Vimeo private videos do not allow thumbnails to be generated for your site. If you use private videos on Vimeo you’ll need to upload a thumbnail using the Teaser Image field on the content
.
Facebook
Facebook is not recommended for Virtual Y content, as any meeting there will also be listed publicly.
If you choose to host virtual meetings on Facebook, they will need to be publicly listed, otherwise it is not possible to create a direct link to the event. To get the link to a public video:
Click the three dots on the bottom right of the video.
Select “Copy Link”
Zoom
A few notes:
If you are creating a recurring Virtual Meeting, please be sure your Zoom meeting recurrence matches the recurrence on the Virtual Y meeting.
If your Zoom meeting requires a password, we recommend generating a link with the password embedded in it. This usually looks something like ?pwd=... in the link. Please review
Zoom’s updated security settings for more information.
Through many tests we determined that Zoom embeds are not reliable and support for that feature has been disabled. Zoom links now display as a “Join” button which should make for a much smoother user experience.
4 - Go-live Checklist
Here are some things you should check before you go live with your Virtual Y site:
Ensure that you’ve disabled links to those sections in your Main Navigation.
Review and click through Main Navigation and
Footer links to ensure they’re all valid.
Visit /admin/content and ensure any demo content is deleted or unpublished.
Visit Virtual Y > Event Series and ensure any demo content is deleted.
Ensure that Virtual Y content is displaying as you expect.
If some content is not displaying, check to ensure all fields are filled in (the Description field is not required but can sometimes prevent content from displaying if left empty).
Review your Authentication
Review and test your Virtual Y Auth provider.
If you’re using the Daxko Barcode provider, ensure you’ve set the Message for login failures at Virtual Y > Virtual YMCA Settings > GC Auth Settings > Edit Daxko barcode provider.
Final clean-up
If you’re using it, ensure you’ve set up Google Tag at Configuration > Services > Google Tag (/admin/config/services/google_tag) with your GA4 measurement ID.
If you’re using any basic authentication to protect the site before it goes live (what Y Cloud calls “Site Lock”), ask your hosting partner to turn it off.
If you’d like to share content with other Ys, review
Shared Content and initiate a connection to the Open Y Shared Content server
5 - FAQs
For up to the minute conversations and info on Virtual Y and its content, join us in the YUSA Slack.
Request access to Slack
Join the
#virtual_ymca Slack channel to where you can talk with other Y associations, the YMCA Website Services team, and partners on how to quickly get your Virtual Y experience launched.
The Virtual Y code is free, but using it is not. Your costs come with having a developer configure Virtual Y as well as from hosting. Time estimate: <30 hours if you stick close to the default implementation and don’t make customizations. The more you deviate, the higher the cost. Costs will include:
Implementation
CRM SSO integration
Domain name and hosting
Training and support (will vary based on team’s comfort working with Drupal)
I’m not on YMCA Website Services
Can I use it if I’m not on YMCA Website Services? Yes!
Our website is built in WordPress. Will Virtual YMCA integrate with WordPress?
Virtual Y is built on YMCA Website Services (Drupal). You would build a stand-alone instance of Virtual Y (see agency partner next steps) that could be linked to from your current site. You can work with an agency of your choice or talk with one of our core partners if your current partner does not develop on Drupal. Time estimate is <30 hours if you stick close to the distribution and don’t customize.
What is my next step for Virtual Y if I’m not on YMCA Website Services?
Have a conversation with your current developer or contact one of our featured partners. You may work with your current web developer if they know Drupal. If not, one of our partners or Y-USA will likely be more economical.
How does my internal developer or agency use Virtual Y?
Here are the Agency Partner/Internal Developer Steps:
The login is the same as for the standard YMCA Website Services sandboxes so
let us know if you need that information.
Committed to VY - Initial Technical Set-Up
I already have an YMCA Website Services site, do I need to upgrade to get Virtual Y?
Nope, unless you’re more than a couple of upgrades behind. Our incredible developer team established a structure to allow Ys to obtain Virtual Y without undergoing a full site upgrade, saving both time and $$$. If it has been 12+ months since your last upgrade, we recommend you proceed to keep your site current with the latest features and security. This will reduce future upgrade costs (it’s more expensive to update a site that is multiple versions behind) and help prepare you for Drupal 9, which was released in February 2021.
If your CRM is not listed, we have a workaround solution where you can upload a CSV file of your active members’ email addresses into your Virtual Y site to grant your Virtual Y visitors access to your content. As long as you can export a basic spreadsheet of your active members, your data is likely compatible with Virtual Y.
Will there be impacts to the domain?
There should not be any impact from your domain if you already use YMCA Website Services. If you do not use YMCA Website Services, you can create a subdomain of your choosing, such as virtualy.yourassociationname.org where virtualy is the subdomain.
What Web Browsers are compatible with Virtual Y?
Virtual Y supports the most recent versions of all modern web browsers such as
Edge,
Firefox,
Chrome,
Safari, and
Opera
Internet Explorer 11 and earlier are not supported due to the inability of that browser to play videos from services such as
https://youtube.com. Here is
YouTube’s official statement on not supporting Internet Explorer.
Setting up Google Analytics for Virtual Y (web) - Note: As of version 11.3.1.0, the google_analytics module has been replaced by google_tag. Configure tracking at Admin > Configuration > Services > Google Tag (/admin/config/services/google_tag).
Committed to VY - Content Editors
Does Virtual Y come with content?
There is demo content for you to test with, but you need to create and post your own content via the platforms mentioned in the next question. Some Ys have shared their content for all to use.
Which platforms can I use to host my content for Virtual Y?
Virtual Y works* with:
YouTube - hosted and livestream
Vimeo - hosted and livestream
Zoom - livestream
Zoom, GoToMeeting and Teams - video conferences
Blogs - any content you post
*Note: “Works with” means technically functional. Each video provider service, such as YouTube, manages their own terms of use, which will guide what’s okay and what’s not.
For Vimeo, is a specific account level needed to host videos to stream/pass through Virtual Y?
Many associations have been buying the Premium level to get access to unlimited livestreaming. Again, the YMCA Website Services Team has no control over Vimeo’s terms of use, and Vimeo’s terms of use are subject to change at any point without prior notice.
Can we keep our YouTube videos unlisted on our channel but still have them play in our Virtual Y?
Yes.
Can we use Facebook video links?
No. Due to restrictions/limitations enforced by Facebook, private videos or videos from a private group cannot be embedded on an external (non-Facebook) site. This means the only option would be to use publicly-facing Facebook Live video within Virtual Y, which can be seen by anyone on Facebook, not just your members. This weakens the case for paying for exclusive access to Virtual Y as a member, and YMCA associations were not interested in YMCA Website Services pursuing this type of Facebook integration.
Can I host Les Mills classes on our Y’s YouTube channel?
Unfortunately, Les Mills licensing does not cover recording the class for rebroadcasting.
Can we use Y360 videos?
Y360 videos are owned exclusively by Y360 and then licensed by Ys. A Y would need to obtain explicit permission from them for usage within Virtual Y. Additionally, YMCA Website Services would first have to build a new integration to accept those videos as on-demand content, because Y360 uses a video hosting service other than YouTube or Vimeo.
Music Licensing
How does music licensing work with this platform?
Music licensing copyrights and restrictions originate with the video platform used (e.g., YouTube, Vimeo) so you need to follow those guidelines. Be very careful to investigate whether the music you use within your branches is OK on livestream workouts.
I’m a live-streaming novice. How do I learn about it?
We’ve got your back. It’s technically possible to do a reasonably good stream with just a smartphone camera. Some associations have opted to invest in more professional technology.
I just heard Y-USA is building a Virtual Y platform. What if I’m already building this with a developer?
Virtual Y is open source software built by the YMCA Website Services. Because this software is open source, it is free for any YMCA to download and use. The Y-USA’s Y Cloud platform uses the Virtual Y module as a plug-and-play standalone micro-site that YMCA Website Services created. Y-USA’s Y Cloud provides Virtual Y as Software-as-a-Service (SaaS) that includes hosting, maintenance and general support of the Virtual Y stand-alone microsite for a low monthly fee. Y-USA provides this as an opt-in option to any YMCA that may be interested. For any further questions, you can contact Y-USA at
ycloud@ymca.net
What’s the difference between Y-USA’s work on Virtual Y and what other partners are doing?
There is no significant customer-facing difference between Y-USA’s Virtual Y SaaS solution, and other partners’ hosting solutions. The functionality should work as expected in both deployment models.
Marketing
Will there be an opportunity for shared content?
Yes. Cross-association content sharing is available now, both for use and for you to contribute your content.
Do associations have access to analytics for Virtual Y?
Yes, there is a tracking log within the admin menu that displays when a user logs in, as well as which pieces of content they view. This allows you to gauge what is most popular with your members. The information can be sorted and exported for ease of use.
Will there be a marketing toolkit?
Ys are responsible for marketing virtual offerings. We encourage associations to share helpful tips on what marketing tactics have worked best for them on the
YMCA Website Services message board, and YMCA Website Services Slack
Enable direct, secure, scheduled person-to-person calls inside your Virtual Y site.
This module is distributed as part of the YCMA Virtual Experience Platform (Virtual Y). Review
the README for more technical information.
Initial configuration
Go to Admin > Extend (/admin/modules) and enable the Virtual Y 1on1 Meeting (openy_gc_personal_training) module.
Go to Admin > Virtual Y > 1on1 Meeting > Settings (/admin/virtual-y/personal_training/settings) and put signals.cibox.tools:8091 as the Signaling PRL.
Go to Admin > People (/admin/people) and add the Virtual YMCA Editor role to the user profile of any users who will create meetings.
NOTE: The admin user will also need to have this role set.
Also at Admin > People (/admin/people), add the Virtual trainer role to at least one user.
If you are starting a new site, log in as a Virtual Y member at least once.
Go to Admin > Virtual Y > 1on1 Meeting (/admin/virtual-y/personal_training) and you should be able to see a dashboard with links to add a 1on1 meeting.
If you receive an Access denied error, be sure to check that you have the Virtual YMCA Editor role as noted in 3.
The community-maintained server, signals.cibox.tools, will work for most sites at small to medium levels of 1-on-1 traffic. If you are planning to scale up this service you may need to maintain a separate
Open Y Sites: Go to Content. Click the Blue “Add Content” button. Select “Virtual Y Video.”
Standalone Virtual Y sites: Go to Virtual Y -> Videos -> Add Video
You can also add a new Video from the main Content tab.
Add a Title for your video and a description. These will display below the video.
Use the Media tab to select your video. Click “Select videos.”
New Videos – The default option.
Name your video the same as your content.
Copy and paste your video URL into the Video URL field
This field currently supports Vimeo and YouTube.
You can use the main url in your browser’s site tab. You don’t need any code or special embed URLs.
All other fields (Media Tags, Directory, Revision Log Message, URL Alias) can usually be ignored.
Previously Uploaded Videos – If you’ve uploaded a video before and you’re reusing it, you can go to the “Select Videos” tab and choose the video you wish to embed.
Select a Level for your Video if applicable (such as for an on-demand class).
You can add/edit the default levels by going to Structure -> Taxonomy -> Virtual YMCA Level -> List terms.
Type in the Instructor name, if applicable.
Choose a category for your video by typing it in and selecting from the dropdown. One category per video.
If your video includes the use of equipment (such as exercise equipment for a workout video), type in the name of your equipment and select from the list. To add another piece of equipment, click “Add another item.”
You can configure the available equipment to choose from by going to Structure -> Taxonomy -> Virtual YMCA Equipment -> List terms.
Add your video’s length in seconds in the “Duration” field.”
To feature your video on the Virtual Y homepage, click the featured box.
Click the blue Save button to save the document.
8 - How to change the Login page photo
Please follow these steps if you wish to customize the photo users will see when they log into the Virtual Y site.
For updating the image before the user logs in…
Log into site as Site Owner
Manage > Content (click directly on Content, not one of its sub-menus)
In the grid, find “Virtual YMCA Login” and click the Edit button for that row.
Expand the “Header Area”
Click the “Edit” button next in the Banner row.
Expand the “Image” section, and where the current image is and click the Remove button underneath the image (not Edit).
Re-expand the “Image” section, and click the “Select Images” button.
If the desired image is not already in the system, click the Upload images link to add that picture.
If the image is already in the system, select that image and click “Select media”.
Scroll down to the bottom of the page and click Save.
If you wish to also modify the image the user sees after they log in, repeat the above steps, but substitute in step #3 “Virtual YMCA” in place of “Virtual YMCA Login”.
9 - Image Guidelines
Virtual Y uses Drupal’s
Image Styles concept to “allow you to upload a single image but display it in several ways.” Because of this, there are not specific image dimensions required for images in your Virtual Y site.
We can, however, provide guidance on what images work best for the image styles being used on the site:
Use high-resolution images if possible, but compress them using a tool like
TinyJPG to make sure they are no more than 1-2MB.
Use landscape-orientation images with a 4:3 or 16:9 ratio. These are common formats so often no cropping is necessary.
Square images are NOT recommended, as they are often cropped in unexpected ways.
Images are sometimes cropped from the top and bottom, so ensure faces or other focal points are in the vertical center of the image.
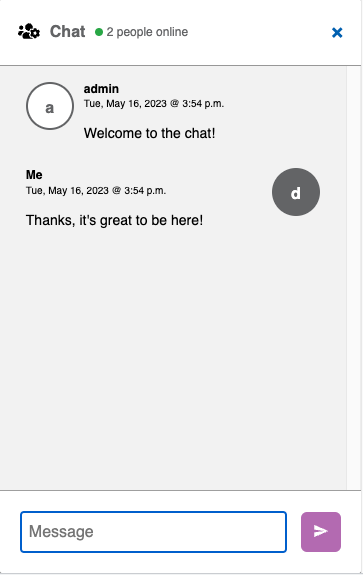
10 - Live Chat
Enable group chat functionality on your live stream events.
This module is distributed as part of the YCMA Virtual Experience Platform (Virtual Y). Review
the openy_gc_livechat README for more technical information.
Initial configuration
Go to Admin > Extend (/admin/modules) and enable the Virtual Y Livechat (openy_gc_livechat) module.
Go to Admin > Virtual Y > Virtual YMCA Settings > Livechat Settings (/admin/openy/virtual-ymca/gc-livechat-settings). Review the settings, and modify if necessary.
Go to Admin > People > Roles > Add role (/admin/people/roles/add) and add a role entitled Virtual Trainer if it does not exist.
Assign this role to any user who should have the ability to disable chat.
NOTE: The admin user will also need to have this role set.
Joining a Live Chat
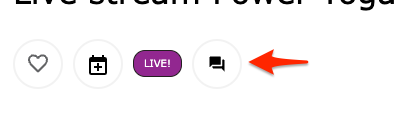
Visit any Live Stream event. At the time that the event starts, a Live Chat button will appear below the video.
The button will not be visible before the event start time. To allow attendees to join before the meeting, set the start time to a few minutes before your actual start.
All participants can enter the chat, set their name, and chat throughout the entire Live Stream event.
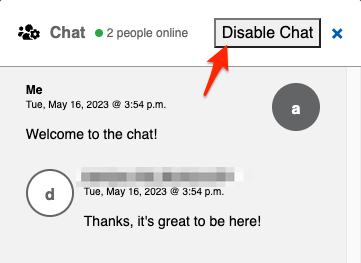
Moderating a Live Chat
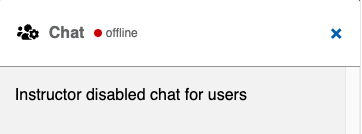
At any point during a chat session, users with the Virtual Trainer role have the ability to disable the chat using the Disable Chat button.
Users will see a message saying “Instructor disabled chat for users”
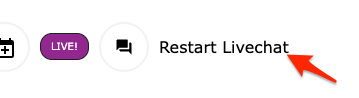
Chat can be restarted using the Restart Livechat button on the event page, next to the chat icon.
Disabling chat will remove the history of that chat from the server.
Chat History
Each Livestream saves its history for a certain amount of time.
The default is 30 days and can be configured in the Live Chat Settings (/admin/openy/virtual-ymca/gc-livechat-settings).
Chat history is saved and can be viewed at Admin > Virtual Y > Virtual Meeting Chat Logs (/admin/virtual-y/chats).
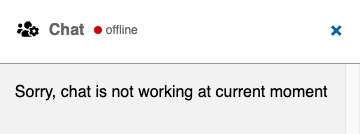
Troubleshooting
If the chat button is not appearing or the dialog displays “Chat is not available” or “Chat is not working at the moment” you will need to check with your development partner to ensure the
Livechat service is properly configured on your server.
11 - Logging
Introduced in
Virtual Y 0.7, the “Open Y Virtual YMCA Log” module generates logs to record user behavior on Virtual Y sites.
To enable the module, visit the Extend page on your site, or ask your partner for assistance.
Once the Log module is enabled, you’ll see two new items in the Virtual Y menu:
Logs
The Virtual Y Logs page displays searchable and filterable individual user activity. Additionally individual log items can be removed.
Activities that are currently being tracked include:
User log in
User views content
The Open Y team is working to add additional logging functionality as they gather requirements. If you have additional logging requirements for your reporting, please
contact the YMCA Website Services team with as much detail about your requirements as possible.
Logs Archives
As of
Virtual Y 1.1, log archives can be generated on-demand via Virtual Y > Logs > Export Log Records
While logging begins immediately, (prior to VY 1.1) log archives should appear on the first day of the month following when logging is enabled. Log archives will be available as .gz files. The archive stores data indefinitely, but the log itself then deletes out the previous month’s info out of the database to start collecting data for the current month.
Virtual Y > Logs stores ONLY the current month’s records
Virtual Y > Logs > Logs Archives keeps monthly archives indefinitely, in the format virtual-y-logs-2021-01.csv.gz
The log archive process depends on Drupal’s cron task, so you’ll need to ensure that cron is running periodically on your site.
To extract files on Mac:
The system’s Archive Utility should work to extract files. If that fails…
(Easy) Download
Keka or
The Unarchiver, install, and use it to extract the file.
(Advanced) Open a Terminal window and navigate to the directory where the zip is, then run gunzip my_log_file.csv.gz
Your Virtual Y log archives may include times in the created column that look like 1606839555. This is a format called “Unix epoch time”. You can convert it to a human-readable format in a few ways:
Use the formula =(A1/86400)+DATE(1970,1,1), substituting the correct cell for A1
Right-click on the column, select “Format Cells”, then choose a Date format.
12 - Managing Footer LInks
Your standalone Virtual Y site may have a block with social media links at the bottom of the page. These links can be customized for many social media services.
Getting to the block editor
Your site may have a “Quick Edit” icon (a tiny pencil) that pops up when you hover over the section with the links. If so, click the pencil, then Edit.
OR
If you don’t see the Quick Edit option, you can navigate to the block editor at Structure > Block Layout > Custom Block Library > Edit Footer Social Block
Editing the block
On in the Block editor you will see a Content field with links to your social media sites.
Adding a link
Add a new item to the bulleted list.
Select the text.
Click the link icon.
Editing links
Select text to link or double-click on an existing link
In URL add the link to the social media site
Edit the Title to something more descriptive
Open the Advanced section and update the CSS classes to select the correct icon. Be sure to copy the entire code below
Released in 0.12, Virtual Y’s Shared Content module allows Y’s to share their content with other associations/branches and to pull shared content to use on their own site.
Requirements
Open Y Gated Content Module
While Shared Content is supported in Open Y Gated Content >=0.12, we recommend that you use
version 1.0 or greater for the best support.
Hosted Videos
Any YouTube video that works in Virtual Y will be sharable.
Vimeo videos that use the “Only on sites I choose” privacy setting should not be shared. Please review the
Vimeo Privacy Settings Overview for full details. If you plan to share content on Vimeo, we recommend:
Who can watch? - “People with the private link” OR “Hide this video on vimeo.com”
Where can this be embedded? - “Anywhere”
Getting Started
To start sharing content, you need to get your site ready.
Enable the modules
On the Drupal Extend page (/admin/modules), enable Virtual Y Shared Content. If your site is hosted on a managed hosting environment, this step is either already done for you or will need to be done by your hosting partner.
Accept any other required modules if asked.
Connect your site to the Open Y server
In order to share content, you’ll first need to register your site with the Open Y shared content server:
Go to Virtual Y > Shared Content > Source Servers (/admin/virtual-y/shared-content/server)
Use the List additional actions arrow (▾) under Operations then Edit
On the following page, simply Save the form. Once you’ve saved the form and your site is able to contact the server, the Source Token will be populated.
New connection requests are curlreviewed periodically and are approved by the Open Y team to prevent abuse. Please allow up to two business days for approval, or email
ycloud@ymca.net with the URL of your site to request approval.
Fetching Shared Content
Once you are connected to the server you may, at any point, Fetch content from the server:
Go to Virtual Y > Shared Content > Source Servers (/admin/virtual-y/shared-content/server)
Fetch content from the Open Y server.
Your site will fetch Virtual Y blog posts and Virtual Y Videos from the server. In each list you may:
Preview content using the button on the right.
Check the box to the left of any content you’d like to use on your site.
Fetch to my site to download the new content.
As of Virtual Y 1.6.1 (released in December 2021) the fetched content list will show items in different states:
Bold items are new to the server since your last visit.
Greyed out items have already been added to your site.
Also in VY 1.6.1, content can be fetched directly from the preview.
Publishing Shared Content
You can share your own content to other Y’s in the Movement too!
Create your Video or Blog post as usual.
To share a single item:
expand the Shared Content options on the sidebar of the content edit page,
then check “Available to share”.
To share multiple items, visit the Content list (/admin/content) then:
Check the Update this item checkbox.
In the Action dropdown, select Share to Virtual Y.
Use the Apply to selected items button.
FAQ
Why can’t another Y see my shared content?
New connection requests are reviewed periodically and are approved by the Open Y team to prevent abuse. Please allow up to two business days for approval, or email
ycloud@ymca.net with the URL of your site to request approval.
Can I share content before my site is live?
If your site is in a “pre-live” mode and is somehow restricted from being publicly accessible (sometimes called “Site Lock” or “HTTP Auth”) you will not be able to share content. Please wait until your site is live to share content.
14 - Software Requirements
Open Y Sites
Open Y version 2.0 or newer.
The ability to install Virtual YMCA modules
Virtual Y Standalone Site
Hosting
Tech stack required
Ubuntu Server (local or Cloud environment) with 2CPU and 2GB of RAM minimum.
Server configured with LAMP stack (Linux/Apache/MySQL/PHP).
Digital Ocean – Cost-effective. For self-installs.
OneEach Technologies – Mid-range. For Ys with developer partners.
Acquia/Pantheon/Platform.sh – Enterprise. For large YMCAs.
SSL (Security Certificate)
Security certificate that authenticates that you own your website. Displays lock icon in user’s web browser. Required by most modern browsers. SSLs are widely available for a large number of reputable providers.
Domain Name (Website Address)
Only required for standalone Y sites . Can be set up with its own unique web address (i.e.,virtualymcatn.org), a unique directory within your existing site (ymcamidtn.org/virtual) or as a subdomain of your existing site (virtual.ymcamidtn.org).
Requirements for each of these setups is unique. Contact your developer partner or the Open Y community for help with your setup.
Sign-In Integration
CRMs with Full Integration
Daxko
Personify
Salesforce (Coming Soon)
Other CRMs
Upload a .csv file of emails to your server to use the manual sign-in experience.
15 - User Segmentation
User segmentation is a feature within Virtual Y that can help you separate your users into different categories. This can allow you to diversify your 2021 membership strategy or break out your Virtual Y content into different categories (fitness, wellness, family enrichment, etc.).
Set Up User Segmentation
On your Drupal toolbar, hover over Virtual Y, and click Virtual YMCA Settings.
Click over to the tab labeled AUTH settings. You will see a list of authentication method options. If you do not see the desired authentication method, you will have to install it from the Extend menu.
Click Edit on the desired authentication method you will be using. User segmentation will be set up in the field labeled Permissions Mapping at the top of this page.
Within the membership field, carefully type in or paste the name of a membership type in your CRM that should be allowed to access Virtual Y. Then, in the dropdown, select what level of access should be granted to users with that membership type.
Continue adding all accepted membership types by clicking the Add one more button until all accepted membership types are listed.
If you want to remove a membership type: Delete the membership name from the field and select None as the Virtual Y role. Then, scroll to the bottom of the page and click the blue Save button. The empty line should disappear from your mapping list.
Add a New Role
You may desire to add additional roles beyond the default 3 that are included in Virtual Y. We recommend including no more than 5 roles, as the level of fragmentation and content management upkeep becomes difficult to sustain beyond that number.
If you are not familiar with Drupal roles, it is recommended you reach out to your agency partner to help you customize your Virtual Y roles.
Click People in the Drupal toolbar
Select the Roles tab at the top of the page
Click the Add Role blue button
Enter in your new role name in the field.
Note: the Machine Name for your role must begin with virtual_y_ or else it will not be included in the permissions mapping table. You can achieve this by either naming your official role “Virtual Y [Desired Role Name]” or by clicking the small Edit button link next to the Machine Name and editing the text.


 .
.